
Solar street lights may stop working after cloudy or rainy days because the battery receives less solar charging while the light still consumes energy every night. After several low-charging days, the controller may reduce brightness, shorten runtime, or shut the lamp down to protect the battery from deep discharge.
For EPC, municipal, and tender projects, this problem should not be judged only as a product failure. Early shutdown can be caused by weak solar panel input, battery capacity loss, aggressive dimming settings, shading, dirty panels, water ingress, incorrect controller profiles, day/night sensor logic, or unrealistic autonomy assumptions.
A proper review should check the weather period, affected pole numbers, battery status, solar panel condition, controller protection mode, dimming profile, wiring, waterproof connectors, sensor logic, and project handover records before replacing components.
Project Review Summary
| Item | Project Review Point |
|---|---|
| Main topic | Solar street lights not working after cloudy or rainy days |
| Best-fit buyers | EPC contractors, municipal project teams, installers, distributors, and maintenance teams |
| Best-fit projects | Municipal roads, rural roads, campus roads, industrial roads, parking areas, security roads, and remote public lighting projects |
| Core search intent | Why solar street lights shut down early or fail after cloudy/rainy weather |
| Main technical causes | Low battery charge, insufficient solar input, aggressive dimming profile, controller low-voltage protection, shading, dirty panels, water ingress, sensor logic error, or weak autonomy margin |
| Main project risk | Handover complaints, batch failure suspicion, night safety issues, repeated maintenance visits, and warranty disputes |
| Related dimming guide | Solar street light dimming profile and battery autonomy |
| Related testing guide | Ground-level test before pole installation |
| Related commissioning guide | Solar street light commissioning checklist |
What Usually Happens After Several Cloudy or Rainy Days?
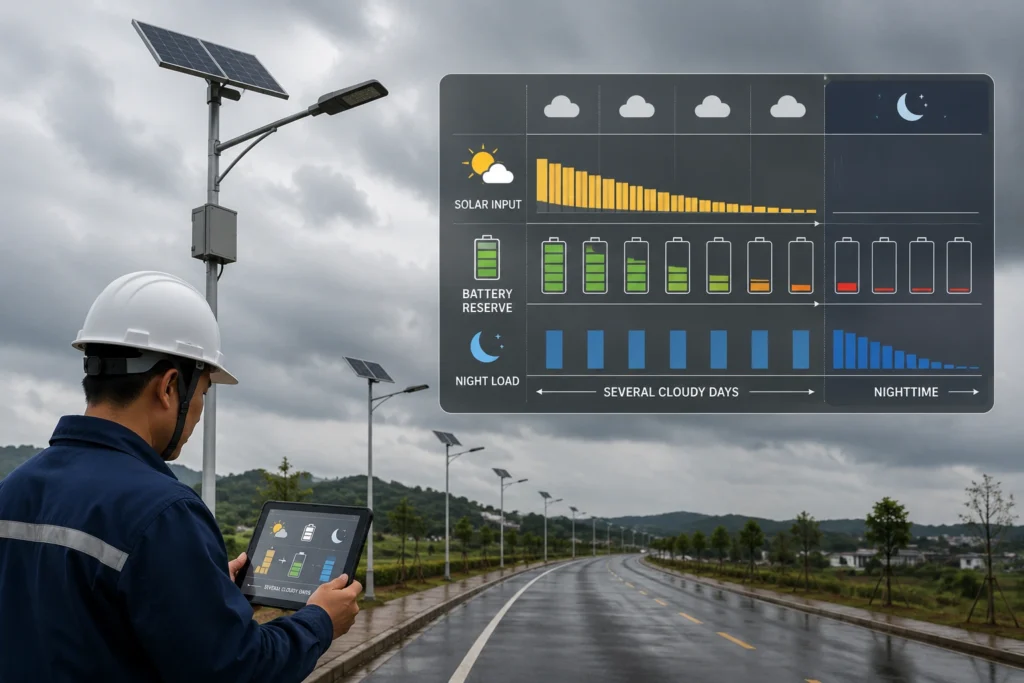
A solar street light depends on a daily energy balance. During the day, the solar panel charges the battery. At night, the battery powers the LED module, controller, sensor, and any communication device.
During cloudy or rainy days, the solar panel may still generate power, but the charging input can drop sharply compared with normal sunny operation. If this continues for several days, the battery may discharge faster than it can be replenished.
One cloudy day may not cause visible failure if the battery has enough reserve. The problem usually appears when several low-charging days occur consecutively while the lamp continues to consume energy every night.
When the battery becomes too low, the controller may:
- Reduce LED brightness.
- Shorten the operating time.
- Disable high-power motion boost.
- Enter low-voltage protection.
- Turn off the lamp temporarily.
- Restart normal operation after sufficient charging.
This is why some solar street lights appear normal during sunny weeks but become dim, unstable, or off after several cloudy or rainy days.
For a broader explanation of night runtime, see Sunlurio’s guide to how long solar street lights last at night.
Is It a Product Failure or a Weather-Related Autonomy Problem?
Not every cloudy-day shutdown is a product defect. In many projects, the system is protecting the battery or operating under an unsuitable energy balance.
| Symptom | Possible Meaning | First Review Direction |
|---|---|---|
| Lamp becomes dim after several cloudy days | Battery charge is low or controller has reduced output | Check battery status, solar charging input, and dimming profile |
| Lamp turns off after a few hours | Battery autonomy may be insufficient for current settings | Review operating hours, brightness schedule, and battery capacity |
| Lamp does not turn on after rain | Possible low battery, water ingress, connector issue, sensor logic issue, or controller protection | Check waterproof connectors, cabinet sealing, controller status, and day/night logic |
| Some poles work but others fail | Site condition, shading, panel direction, wiring, or individual component issue | Compare affected and normal poles |
| Many poles in one section fail together | Shared site problem, same profile, shading, weather exposure, or batch setting issue | Record pole numbers and review the area as a group |
| Lamp recovers after sunny days | Battery was likely undercharged during cloudy/rainy period | Review autonomy margin and rainy-season sizing |
| Lamp does not recover after sunny days | Possible hardware, wiring, battery, water ingress, or controller issue | Perform deeper inspection before component replacement |
The review should start with evidence, not assumptions. A lamp that stops working after cloudy weather may have a product issue, but it may also be responding correctly to low battery conditions.
Common Reasons Solar Street Lights Stop Working After Cloudy or Rainy Days
1. The Battery Did Not Receive Enough Solar Charging
The most common reason is insufficient daytime charging. Cloudy weather, rainy conditions, dust, shading, poor panel direction, or a low sun period can all reduce solar input.
If the battery does not receive enough charging during the day but continues to discharge at night, the stored energy will decrease. After several days, the controller may limit output or turn off the lamp.
Project teams should check:
- Solar panel cleanliness.
- Panel direction and tilt.
- Shading from trees, buildings, poles, signs, or cables.
- Local cloudy or rainy weather duration.
- Whether the system was designed for the worst operating season.
- Whether the solar panel size matches the required autonomy.
2. The Dimming Profile Consumes Too Much Energy
A solar street light may fail after cloudy days if the dimming profile is too aggressive.
For example, if the lamp runs at high brightness for too many hours, the battery drains faster. During sunny weather, the system may still recover each day. During cloudy or rainy periods, the charging input drops and the same brightness schedule may become unsustainable.
High-risk settings include:
- 100% brightness for most of the night.
- Motion boost triggered too frequently.
- Long operating hours without reduced brightness.
- Different settings across poles in the same project.
- Manual remote changes that override the approved profile.
- No rainy-season margin in the controller profile.
For a deeper review, see Sunlurio’s guide to solar street light dimming profile and battery autonomy.
3. The Controller Entered Low-Voltage Protection
Solar street light controllers usually include battery protection logic. When battery voltage or state of charge becomes too low, the controller may reduce output or stop discharge to protect the battery.
This can look like a failure to the user, but it may be a protection response.
Common signs include:
- The lamp turns on briefly and then shuts down.
- Brightness becomes weaker than normal.
- The lamp stops working for one or more nights.
- Operation recovers after enough sunny charging.
- The problem appears after several cloudy or rainy days.
Low-voltage protection should not be ignored. It indicates that the system is under energy stress or that the battery condition should be checked.
4. The Battery Capacity Is Too Small or Has Degraded
Battery capacity directly affects autonomy. If the battery is undersized, aged, damaged, or repeatedly discharged too deeply, it may not support the required lighting schedule during poor weather.
An older battery may still show voltage during a short check, but its usable capacity may be much lower than the original design value. This is why some lights appear normal during sunny periods but shut down earlier after several cloudy or rainy days.
Project teams should review:
- Battery capacity in watt-hours.
- Battery age and cycle history.
- BMS protection status.
- Temperature exposure.
- Depth of discharge setting.
- Whether the battery was sized for rainy-season autonomy.
- Whether the battery can support the approved brightness schedule.
Even with LiFePO4 batteries, autonomy still depends on capacity, charging input, controller logic, and load profile. Battery chemistry alone does not guarantee multi-day runtime.
5. Solar Panels Are Dirty, Shaded, or Poorly Oriented
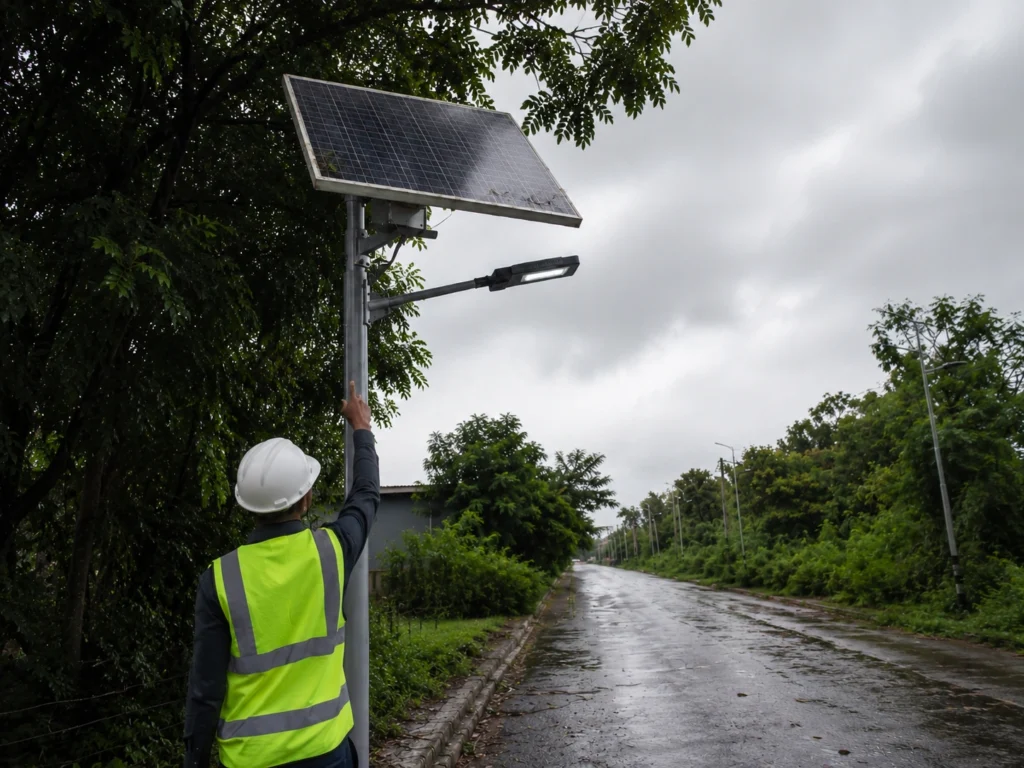
Panel condition becomes more important during cloudy or rainy periods because the charging margin is already reduced.
Common site problems include:
- Dust accumulation.
- Mud splash after rain.
- Bird droppings.
- Leaves or debris.
- Tree shading.
- Building or signboard shading.
- Incorrect panel direction.
- Panel angle unsuitable for local conditions.
Rain does not always clean the panel. In dusty or roadside environments, rain may leave mud spots, dust film, water marks, leaves, or debris on the panel surface, reducing charging after the weather clears.
A small charging loss may not be obvious during sunny weather. But during cloudy days, the same loss can become enough to cause early shutdown.
6. Water Ingress Affects Connectors or Control Compartments
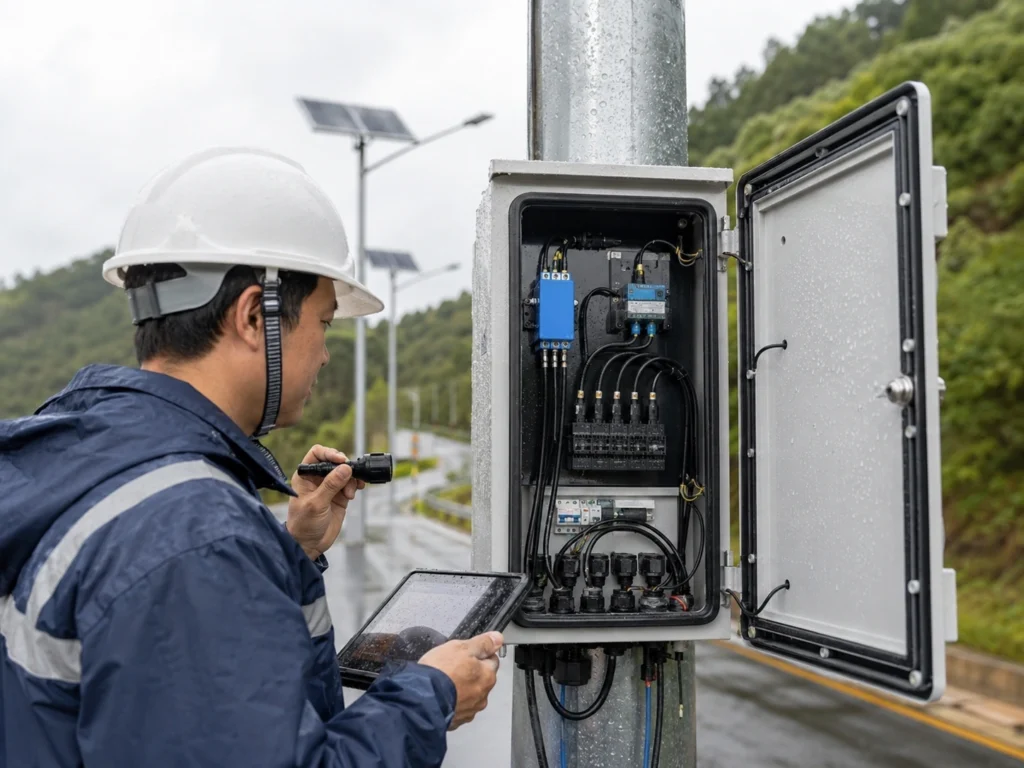
If a solar street light fails after rain, the review should include waterproofing.
Possible risk points include:
- Loose waterproof connectors.
- Damaged cable glands.
- Poor cabinet sealing.
- Missing or damaged rubber gaskets.
- Water inside the control box.
- Corrosion at terminals.
- Improper cable routing.
- Connector exposure after installation.
If the lamp does not recover after sunny charging, or if the issue appears immediately after rainfall, the maintenance team should inspect for moisture, corrosion, short-circuit risk, loose waterproof connectors, damaged cable glands, and water marks inside the control compartment.
This problem is different from normal cloudy-day undercharging. If water ingress is found, the issue should be recorded, corrected, and checked across similar installation points.
7. Motion Sensors Trigger Too Frequently
Motion-based dimming can save energy when traffic is low. But if the sensor is triggered frequently, the lamp may stay at high brightness for longer than expected.
This can happen on:
- Busy municipal roads.
- Industrial access roads.
- Parking areas with frequent movement.
- Roads with animals, trees, or false triggering.
- Sites with incorrect sensor angle or delay time.
- Installations where radar or microwave sensors are too sensitive for the site.
If the project uses PIR or radar motion dimming, the team should review sensor type, detection range, mounting height, delay time, and actual traffic frequency.
8. The Project Autonomy Requirement Was Too Optimistic
Some projects assume ideal sunlight conditions when sizing the solar panel and battery. This may create problems during the rainy season or worst operating month.
A system that works well during sunny weather may fail when:
- Cloudy days last longer than expected.
- Nightly operating hours are longer than planned.
- Brightness settings are higher than the design assumption.
- Motion boost is triggered more often than expected.
- Panel shading or dust reduces charging.
- Battery capacity is lower than required.
- The project needs 5 to 7 days of autonomy but was sized for less.
Autonomy should be reviewed against real project conditions, not only ideal weather.
9. Photocell or Day/Night Sensor Logic Is Abnormal
Some solar street lights use a photocell, daylight sensor, or solar panel voltage signal to judge day and night status. If moisture, dust, wiring problems, or sensor damage affects this logic, the light may fail to switch on correctly after cloudy or rainy weather.
Project teams should check:
- Whether the light turns on during a proper night simulation.
- Whether the panel or sensor surface is blocked by dirt or water marks.
- Whether the day/night switching logic works after the battery is sufficiently charged.
- Whether connector or controller issues are affecting the signal.
- Whether the same behavior appears on multiple poles or only one unit.
This issue should be separated from low-battery shutdown. A lamp may have enough battery energy but still fail to switch correctly if day/night detection is abnormal.
First Checks Before Replacing Components
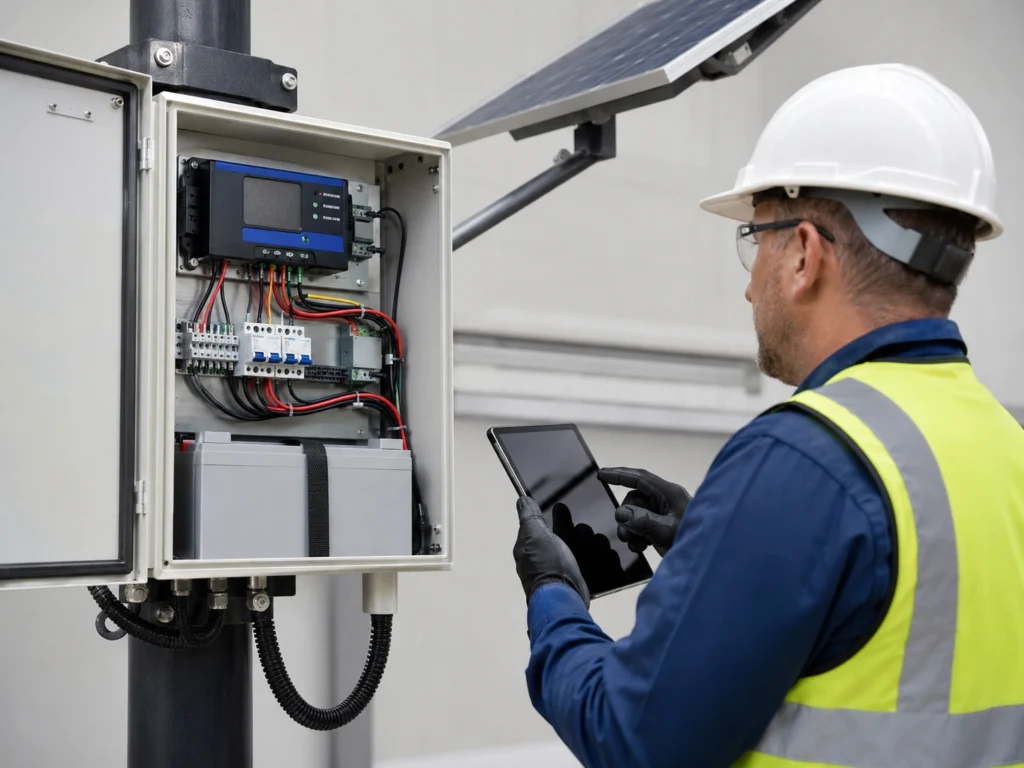
Before replacing batteries, controllers, or luminaires, the project team should collect basic evidence. This helps separate product failure from site condition, settings, or maintenance issues.
| Check Item | What to Review |
|---|---|
| Weather record | How many cloudy or rainy days occurred before the failure |
| Affected scope | One lamp, several lamps, one road section, or many project zones |
| Battery status | Low charge, protection mode, abnormal voltage, or normal recovery |
| Solar panel condition | Dust, mud, shading, orientation, damage, or loose mounting |
| Controller profile | Brightness schedule, motion mode, operating hours, and protection logic |
| Connector condition | Waterproof connectors, cable glands, terminals, and cabinet sealing |
| Sensor behavior | PIR or radar trigger frequency, delay time, false triggering, or abnormal day/night switching |
| Night test result | Whether the lamp turns on, dims, shuts down early, or stays off |
| Handover record | Approved profile, pole number, issue note, and correction status |
For project teams, the key question is not only “Which component is broken?”
The better question is:
Does the installed system still match the approved battery autonomy, dimming profile, and rainy-season operating requirement?
How to Troubleshoot a Solar Street Light After Cloudy or Rainy Days
A practical field review can follow this sequence.
Step 1: Record the Affected Pole Numbers
Do not inspect only one lamp visually. Record the affected pole numbers, road section, project zone, and failure pattern.
Check whether:
- Only one lamp is affected.
- Several lamps in one area are affected.
- The whole project has similar symptoms.
- Some lamps recover after sunny days.
- Failure appears only after rain.
- The issue repeats every rainy period.
This information helps identify whether the problem is individual, site-related, or project-wide.
Step 2: Check Whether the Lamp Is in Protection Mode
If the battery is too low, the controller may stop output. The lamp may not be broken. It may be protecting the battery.
Check whether the lamp:
- Turns on briefly.
- Turns on only after charging.
- Becomes dim before shutting down.
- Recovers after sunny weather.
- Shows controller or indicator signs if available.
Do not repeatedly force high brightness without checking battery condition.
Step 3: Inspect the Solar Panel
Panel inspection should include both surface condition and installation condition.
Review:
- Dust or mud on the panel.
- Bird droppings or leaves.
- Water marks or dust film after rain.
- Cracked or damaged panel surface.
- Shading during key charging hours.
- Panel direction.
- Panel tilt.
- Loose brackets.
- Cable routing from panel to controller.
In many projects, panel cleaning and shading correction can improve charging more than replacing electrical components.
Step 4: Check Waterproof Connectors and Cable Entry Points
If the problem appears after rain, water ingress must be checked.
Inspect:
- Waterproof pin connectors.
- Cable glands.
- Control box gasket.
- Terminal blocks.
- Fuse holder or protection device.
- Cable insulation.
- Cabinet drainage and sealing.
- Corrosion marks.
- Moisture or water marks inside the compartment.
Do not ignore small water marks inside the control compartment. They can create intermittent faults that appear only during or after rainy weather.
Step 5: Review the Dimming Profile
Check whether the actual controller profile matches the approved project setting.
Review:
- First-hour brightness.
- Middle-of-night brightness.
- Pre-dawn brightness.
- Motion boost level.
- Sensor delay time.
- Total operating hours.
- Whether different poles use the same profile.
- Whether remote control settings were changed during installation.
A dimming profile that is safe in sunny weather may be too aggressive during cloudy or rainy periods.
Step 6: Check Day/Night Switching Logic
If the lamp has enough charge but still does not turn on correctly, the day/night switching logic should be checked.
Depending on the product design, this may involve:
- Photocell response.
- Daylight sensor condition.
- Solar panel voltage signal.
- Controller input signal.
- Connector or wiring condition.
- Whether the lamp responds correctly during a proper night simulation.
For pre-installation testing methods, see Sunlurio’s guide to ground-level test before pole installation.
Step 7: Compare One Failed Pole With One Normal Pole
If possible, compare an affected pole with a nearby normal pole.
Compare:
- Panel cleanliness.
- Shading condition.
- Battery status.
- Controller setting.
- Waterproof connector condition.
- Installation direction.
- Sensor activity.
- Day/night switching behavior.
- Night operation pattern.
This comparison often reveals whether the problem is a component issue or a site condition issue.
Step 8: Record the Finding Before Repair
Before replacing parts, record the evidence.
A useful maintenance record should include:
- Pole number.
- Failure date.
- Weather period before failure.
- Battery status.
- Panel condition.
- Controller profile.
- Sensor setting.
- Day/night switching result.
- Waterproof inspection result.
- Corrective action.
- Recovery result after charging or repair.
This helps EPC and municipal teams manage warranty discussions and avoid repeated site visits.
One Lamp Fails vs Many Lamps Fail
The number of affected lamps changes the review logic.
| Failure Pattern | Likely Review Direction |
|---|---|
| One lamp fails after rain | Check water ingress, connector, battery, controller, sensor logic, and local shading |
| One lamp shuts down early every night | Check battery capacity, LED load, dimming profile, and panel input |
| Several lamps on one road section fail | Check shared shading, same controller profile, panel direction, or local installation issue |
| Many lamps become dim after cloudy days | Check autonomy margin, rainy-season sizing, and dimming schedule |
| Lamps recover after sunny days | Undercharging and autonomy margin are likely involved |
| Lamps do not recover after sunny days | Component failure, wiring, battery damage, water ingress, or controller issue needs closer review |
This distinction is important. Replacing parts without understanding the failure pattern can waste time and may not solve the project issue.
How to Reduce Cloudy-Day and Rainy-Day Failure Risk
The best time to reduce rainy-day failure risk is before production, installation, and handover.
Project teams should review:
- Worst-month solar conditions.
- Required autonomy days.
- Nightly operating hours.
- Approved dimming profile.
- Battery watt-hour capacity.
- Solar panel wattage and charging margin.
- Pole height and panel position.
- Panel shading risk.
- Waterproof connector quality.
- Cabinet sealing and cable entry points.
- PIR or radar sensor trigger behavior.
- Photocell or day/night switching logic.
- Commissioning and handover records.
A project should not be approved only because the lamp turns on during a short test. It should be checked against the real operating season and project responsibility.
For installation-stage checks, see Sunlurio’s guide to ground-level test before pole installation. For final handover, see the solar street light commissioning checklist.
What Project Buyers Should Confirm Before Ordering
Before confirming a solar street lighting order for rainy or cloudy regions, project buyers should clarify:
- Project country and city.
- Road type or site type.
- Pole height and spacing.
- Required lighting hours per night.
- Expected autonomy days.
- Rainy-season duration.
- LED wattage and dimming schedule.
- Motion sensor requirement.
- Battery capacity and chemistry.
- Solar panel size and mounting condition.
- Controller protection logic.
- Day/night switching method.
- Waterproof rating and cabinet design.
- Required commissioning and handover documents.
For tender projects, these assumptions should be reflected in the datasheet, BOQ, installation drawing, and handover record.
Sunlurio can support project teams with datasheets and installation drawings and BOQ and tender document support before shipment and installation.
When a Basic Site Check Is Not Enough
A basic site check may not be enough when the project has repeated failures, strict public lighting requirements, or warranty disputes.
A deeper review may be needed when:
- Multiple lamps fail in the same area.
- The same problem appears every rainy season.
- Lamps do not recover after sunny days.
- The project has public road safety requirements.
- The customer requires proof before accepting handover.
- Battery autonomy is part of the contract.
- The project uses different dimming profiles by zone.
- Water ingress is suspected across many poles.
- The installation team changed settings on site.
- Sensor or day/night switching behavior is inconsistent.
- The project requires lighting simulation or consultant approval.
For projects that require lighting layout verification, Sunlurio can provide DIALux simulation outputs to support project review.
Request a Rainy-Season Performance Review
Sunlurio can help EPC contractors, municipal project teams, and project distributors review solar street light performance for cloudy and rainy operating conditions.
A project review can include:
- Battery autonomy requirement.
- Solar panel input review.
- Dimming profile review.
- PIR or radar motion setting review.
- Controller protection logic.
- Day/night switching logic.
- Rainy-season operation risk.
- Waterproof connector and cabinet design.
- Commissioning and handover records.
To prepare a useful review, the project team can share the project quantity, pole height, road width or site type, operating hours, autonomy requirement, local rainy-season condition, current dimming profile, and failure pattern.
This helps separate real product failure from undercharging, incorrect settings, site condition, water ingress, and maintenance problems.
Related Setup, Testing, and Commissioning Guides
For project teams reviewing cloudy-day or rainy-day solar street light failures, these related guides may be useful:
- Basic remote control setup steps
- Solar street light commissioning checklist
- Ground-level test before pole installation
- Solar street light dimming profile and battery autonomy
- How long solar street lights last at night
- Engineering support for solar street lighting
- Datasheets and installation drawings
- DIALux simulation outputs
- Solar street light product configurations
FAQ
Why do solar street lights stop working after cloudy days?
Solar street lights may stop working after cloudy days because the solar panel provides less charging input while the battery continues to power the light every night. After several low-charging days, the controller may reduce output or shut down the lamp to protect the battery.
Why do solar street lights stop working after rain?
After rain, solar street lights may stop working because of low battery charge, reduced solar input, water ingress, loose waterproof connectors, damaged cable glands, controller protection, battery problems, or abnormal day/night switching logic. The review should include both energy balance and waterproofing.
Will solar street lights charge on cloudy days?
Solar street lights can still charge on cloudy days, but charging input is usually lower than on sunny days. If cloudy weather lasts for several days, the battery may not receive enough energy to support the full night schedule.
Why does a solar street light turn off after a few hours?
A solar street light may turn off after a few hours because the battery is low, the dimming profile consumes too much energy, the solar panel charging input is weak, the controller has entered low-voltage protection, or the battery capacity is no longer sufficient.
Is early shutdown always a product defect?
No. Early shutdown can be caused by product failure, but it can also be caused by undercharging, shading, dirty panels, aggressive brightness settings, frequent motion triggering, rainy-season conditions, abnormal sensor logic, or an undersized battery and solar panel.
How many rainy days should solar street lights support?
There is no universal number. Many projects may start with 3 days of autonomy, while critical roads, remote areas, or long rainy-season projects may request 5 to 7 days. Higher autonomy usually requires larger battery capacity, larger solar panel input, or a more conservative dimming profile.
What should be checked first when solar street lights fail after rain?
Start by checking the affected pole numbers, recent weather, battery status, solar panel condition, controller protection status, waterproof connectors, cable glands, control compartment sealing, dimming profile, sensor logic, and whether the lamp recovers after sunny days.
Can changing the dimming profile solve rainy-day failures?
Changing the dimming profile can help reduce energy consumption and improve rainy-day runtime, but it cannot fix every problem. If the battery, solar panel, wiring, waterproofing, sensor logic, or installation condition is wrong, those issues must also be corrected.
What should EPC teams record during rainy-season troubleshooting?
EPC teams should record pole number, failure date, weather period, battery status, panel condition, controller profile, sensor setting, day/night switching result, waterproof inspection result, corrective action, and recovery result. This helps separate product failure from site or setting problems.
