
Quick Answer
To test solar street lights before pole installation, assemble the lamp, solar panel, battery, controller, and cables on the ground, then check battery status, perform a cover-and-uncover test for the photocell or daylight sensor, test LED output, confirm remote or motion sensor response, and restore the final operating mode before lifting the fixture onto the pole.
For EPC contractors, installation teams, municipal projects, and project distributors, this ground-level test helps detect battery, wiring, controller, solar panel input, remote response, and setting problems before the light is installed at 6, 8, 10, or 12 meters. Once the fixture is already mounted, even a small connector, controller, battery, or profile issue can require extra equipment, labor, and site time to correct.
A practical pre-installation test should answer these questions:
- Does the lamp body match the project model and BOQ?
- Is the battery charged enough for activation and testing?
- Does the controller wake up correctly after transport?
- Can the solar panel input be detected?
- Does the LED module turn on under simulated night conditions?
- Does the remote, photocell, or motion sensor respond correctly?
- Is the final operating mode restored before pole lifting?
- Has the test result been recorded by pole number or installation zone?
For multi-pole solar street lighting projects, this test should be part of the full solar street light commissioning checklist before final handover.
Step-by-Step Procedure: How to Test Solar Street Lights Before Pole Installation
To test a solar street light before pole installation, assemble the light, solar panel, battery, controller, and cables on the ground, then check battery status, simulate night conditions, confirm LED output, test motion sensor response if used, and restore the final operating mode before lifting the lamp onto the pole.
-
Perform ground assembly.
Place the luminaire, solar panel, battery pack, controller compartment, brackets, and cables on a clean, flat surface. Use a protective cloth or clean board if needed to avoid scratching the solar panel or lamp housing. -
Connect the system correctly.
Connect the solar panel, battery, controller, and light fixture according to the supplier’s wiring instructions. Make sure waterproof pin connectors are fully aligned, locked, and not forced in the wrong direction. -
Check battery status.
Confirm that the battery has enough charge for activation and testing. If the product has been stored for a long time, follow the supplier’s charging instruction before testing. A low battery may trigger protection mode and prevent the light from turning on. -
Run the cover-and-uncover test.
Cover the solar panel fully with a heavy cloth, box, or cardboard to simulate nighttime conditions. The light should turn on after the controller detects low light. Remove the cover and confirm that the light turns off or returns to charging mode under daylight. -
Test the photocell or daylight sensor.
Repeat the cover-and-uncover process two or three times to confirm that the controller switches correctly between day and night logic. Do not judge the light as defective before confirming whether daylight detection is active. -
Test motion sensor response if applicable.
If the light uses PIR, radar, or microwave motion sensing, keep the panel covered so the lamp remains in night mode. Walk in front of the sensor or wave your hand within the detection area. The light should increase brightness, then dim back after the programmed delay. -
Check LED output and dimming response.
Confirm that the LED turns on steadily without flicker, abnormal flashing, or sudden shutdown. If dimming modes are used, test whether the brightness changes according to the selected controller profile. -
Verify electrical output only if trained.
If trained technicians use a multimeter, set it to DC voltage and check the solar panel output in direct, unshaded sunlight. The open-circuit voltage, often marked as Voc, should be reviewed against the panel specification. Do not short connectors, reverse polarity, open sealed battery packs, or modify controller wiring during a basic site test. -
Restore the final project mode.
After testing, return the light to the approved AUTO mode, dimming schedule, motion mode, or project controller profile. Do not leave different lamps in different manual test modes before pole lifting. -
Record the test result.
Record the product model, pole number, battery status, panel input, LED response, remote response, final mode, issue note, and correction status before installation.
Project Review Summary
| Item | Project Review Point |
|---|---|
| Main topic | Solar street light pre-installation testing |
| Best-fit buyers | EPC contractors, installation teams, municipal project teams, project distributors, and tender buyers |
| Best-fit projects | Road lighting, campus roads, parking areas, rural access roads, industrial roads, and multi-pole solar street lighting projects |
| Main testing stage | Before pole lifting or before final site installation |
| Key checks | Battery status, solar panel input, controller response, LED output, remote response, photocell, motion sensor, cable connection, and final mode |
| Main risk if skipped | Rework after pole installation, wrong controller mode, short runtime, dark lamps, or inconsistent operation |
| Related guide | Full commissioning checklist before project handover |
Where This Pre-Installation Test Applies
Pre-installation testing is especially useful for projects where correcting a problem after pole installation would require extra equipment, labor, or repeat site visits.
| Project Type | Why Ground-Level Testing Matters |
|---|---|
| Municipal road lighting | Reduces handover delay and helps standardize controller settings |
| Campus and compound roads | Helps avoid dark areas caused by wrong mode or poor charging |
| Parking and logistics areas | Reduces rework when many poles are installed in one batch |
| Rural access roads | Helps detect battery, wiring, and panel issues before remote site installation |
| Industrial roads | Supports clearer installation records and later maintenance |
| EPC tender projects | Helps match the supplied system with BOQ, drawings, and approved profile |
This guide is not written for small decorative garden lights only. It is mainly for project-grade solar street lights used on roads, campuses, parking areas, industrial sites, rural access roads, and municipal lighting projects.
Why Testing Before Pole Installation Matters
Testing before pole installation matters because most problems are easier, faster, and cheaper to solve while the solar street light is still on the ground.
A solar street light may look complete when unpacked, but several issues can still appear before installation:
- The battery may be too low after storage or transport.
- The controller may still be in shipping or protection mode.
- The remote may not match the controller type.
- The solar panel connector may not be fully locked.
- The LED module may not respond under test conditions.
- The photocell or daylight sensor may not switch correctly.
- The motion sensor may not trigger the expected brightness change.
- The lamp may be left in the wrong mode after testing.
- The final dimming profile may not match the project requirement.
If these issues are found before pole lifting, the team can correct them quickly. If they are found after installation, the team may need a ladder truck, crane, lift platform, or repeat site visit.
For EPC and municipal projects, pre-installation testing also creates a clear record. It helps the project team prove that the system was checked before mounting, instead of waiting for the client to report problems after handover.
Pre-Installation Testing Is Not the Same as Final Commissioning
Pre-installation testing confirms that each solar street light is ready to be installed. Final commissioning confirms that the installed system is ready for project handover.
These two steps are connected, but they are not the same.
| Stage | Main Purpose | When It Happens | Main Focus |
|---|---|---|---|
| Pre-installation test | Confirm each unit works before pole lifting | Before installation or before mounting | Battery, controller, LED output, remote response, photocell, motion sensor, cable connection |
| Installation | Mount the system on site | During site work | Pole, bracket, panel, luminaire, wiring, fasteners |
| Final commissioning | Confirm project readiness before handover | After installation | Night operation, controller profile, zone consistency, handover records |
| Maintenance | Keep the system working after handover | After operation starts | Cleaning, inspection, battery health, fault correction |
A ground-level test can confirm that the lamp responds, but it cannot fully confirm night lighting performance, road coverage, long-term battery autonomy, or project acceptance. That is why it should be followed by night testing and handover records.
For the full project handover process, see the solar street light commissioning checklist.
What to Prepare Before Testing
Before testing a solar street light, the installation team should prepare the product, documents, tools, and test area.
A clean test setup reduces false judgments. For example, if the panel is exposed to daylight, the controller may think it is daytime and prevent the lamp from turning on. If the battery is too low, the lamp may not respond because the controller is protecting the battery, not because the LED is defective.
Prepare the following items:
| Item | Why It Is Needed |
|---|---|
| Product datasheet | Confirms model, system configuration, battery, panel, and controller |
| Installation drawing | Shows connection method, bracket, cable route, and mounting logic |
| BOQ or project list | Confirms the product matches the project requirement |
| Remote control or controller tool | Used for activation, mode confirmation, and basic response test |
| Multimeter or test device, if available | Helps trained technicians check DC voltage or connection status |
| Clean test area | Prevents damage to lamp, panel, cable, and connectors |
| Shade cloth, cardboard, or panel cover | Simulates night condition during photocell testing |
| Test record sheet | Records pole number, test result, issue note, and correction status |
For tender or project installation, the site team should also keep the approved datasheets and installation drawings available during testing.
Safety Note Before Testing
Pre-installation testing should be carried out by trained installation staff or technicians who understand the supplier’s wiring, battery, controller, and protection instructions.
Before testing, do not randomly open sealed battery packs, cut cables, reverse polarity, short connectors, or change controller settings without recording the change. If a lamp does not respond, the team should first check battery status, daylight detection, connector condition, controller activation, and supplier instructions before assuming the product is defective.
Electrical output checks should only be done by trained technicians. If a multimeter is used, set it to DC voltage and follow the supplier’s testing instructions. Do not short waterproof pin connectors, reverse polarity, open sealed battery packs, or modify controller wiring during a basic site test.
For large EPC or municipal projects, abnormal units should be separated, recorded, and reviewed before pole lifting.
Step 1: Perform Ground Assembly and Component Check
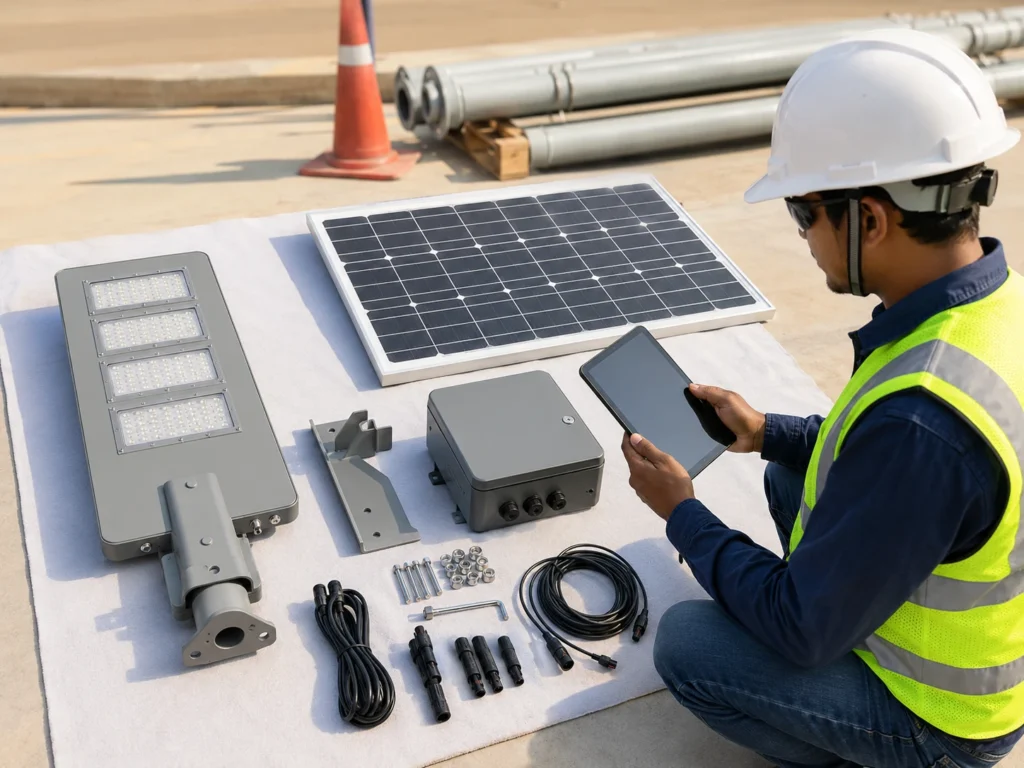
The first step is to assemble the main components on the ground and confirm that the delivered solar street light matches the approved project configuration.
Lay the luminaire, solar panel, battery pack, controller compartment, cables, brackets, and accessories on a clean, flat surface. A protective cloth, carton board, or clean work platform can help avoid scratching the solar panel glass, lamp housing, or optical surface.
Check the following:
- Luminaire model and power rating.
- Solar panel size and mounting bracket.
- Battery type and capacity.
- Controller type and protection features.
- Cable length and connector type.
- Waterproof pin connectors and cable labels.
- Pole bracket or arm compatibility.
- Remote control or controller tool.
- Screws, bolts, fasteners, and mounting accessories.
- Labels, packaging, or project identification if required.
Do not start electrical testing before checking the physical components. If the wrong model, bracket, panel, battery, or controller is used, the light may still turn on during a short test but fail to meet the project requirement later.
For project teams, this step should be compared with the approved BOQ, datasheet, or tender document. If the product configuration does not match the approved file, the issue should be corrected before installation.
For BOQ and tender projects, Sunlurio can support BOQ and tender document support before shipment or installation.
Step 2: Check Battery Status Before Activation
The battery should be checked before the lamp is tested. A low battery is one of the most common reasons why a solar street light does not respond during installation.
Many project-grade solar street lights use battery protection logic. If the battery voltage is too low, the controller may stop output to protect the battery from deep discharge. In this condition, pressing the remote repeatedly may not solve the problem.
Before testing, check:
- Whether the battery connector is properly connected.
- Whether the battery compartment is secure and sealed.
- Whether the battery has enough charge for activation.
- Whether the system may have entered low-voltage protection.
- Whether the product has been stored for a long time before installation.
- Whether the battery specification matches the project file.
If the battery is too low, the correct action is usually to recharge the system or follow the supplier’s activation instructions. Do not assume the lamp is defective before checking battery status.
For large projects, battery status should be recorded by batch, pole number, or installation zone, especially if the products were stored before installation.
Step 3: Confirm Controller Activation and Protection Mode
The controller is the center of the solar street light system. It manages charging, discharging, dimming, sensor logic, battery protection, daylight detection, and remote response.
Before pole installation, the team should confirm that the controller has been activated correctly. Some systems may be shipped in sleep mode, transport mode, or protection mode. This is normal for many project-grade solar lighting systems.
Check whether:
- The controller has been activated after unpacking.
- The battery and solar panel are connected in the correct order, if required.
- The LED output responds under test conditions.
- The controller is not locked by low-voltage protection.
- The correct project profile has been loaded or selected.
- The controller responds to the remote or control tool.
- Any warning or abnormal behavior is recorded.
A controller problem is not always a hardware failure. It may be caused by wrong activation sequence, low battery, daylight detection, incorrect connection, or mismatched remote type.
For basic button functions and remote setup logic, see the guide to basic remote control setup steps.
Step 4: Run the Cover-and-Uncover Test for the Photocell
Many solar street lights will not turn on during daytime because the controller detects sunlight from the solar panel or photocell.
This is a normal control behavior. The system is designed to charge during the day and turn on at night. If the installer tests the light under strong daylight without simulating night, the lamp may not turn on even when the system is normal.
To run the cover-and-uncover test:
- Cover the solar panel fully with a heavy cloth, cardboard, or dark cover.
- Wait for the controller to detect low light.
- Press the correct ON or AUTO command if required.
- Check whether the LED output responds.
- Remove the cover and allow light to reach the panel again.
- Confirm whether the lamp turns off or returns to charging mode.
- Repeat the cover-and-uncover process two or three times if needed.
Do not partially cover only one corner of the panel if the controller still receives enough light. The test may fail because the system still thinks it is daytime.
Also avoid testing under strong reflected light from nearby lamps, vehicles, windows, or shiny surfaces if the sensor logic is sensitive.
Step 5: Test LED Output, Photocell, and Dimming Response
After battery and controller activation are confirmed, the team should test whether the LED module turns on correctly under simulated night conditions.
This is not only a “lamp on or off” check. The installer should also observe whether the light output is stable, whether there is flicker, whether brightness changes correctly, and whether the fixture responds to the selected operating mode.
Check:
- Does the lamp turn on when the panel is fully covered?
- Does the lamp turn off or return to charging mode when the cover is removed?
- Is the light output stable?
- Is there visible flicker or abnormal flashing?
- Does the brightness level change when dimming is tested?
- Does the lamp return to AUTO mode after testing?
- Are any abnormal units separated and recorded?
For multi-pole projects, do not rely on testing only one sample lamp unless the project team has approved a sample-testing method. A reasonable sample test or full-unit ground test should be agreed based on project size, delivery batch, and site risk.
Step 6: Test Remote and Motion Sensor Response
Remote and motion sensor response should be tested carefully. The purpose is to confirm that the controller receives commands and that the sensor logic works, not to randomly change every lamp setting.
For small installations, the remote may be used to turn the lamp on, test AUTO mode, change brightness, or check motion response. For EPC and municipal projects, remote control should be handled more carefully because random settings can create inconsistent performance across the site.
During remote testing, check:
- Whether the remote battery is working.
- Whether the remote type matches the controller.
- Whether the distance and direction are suitable.
- Whether ON, OFF, AUTO, Timer, DIM, or sensor functions respond as expected.
- Whether the lamp is restored to the approved final mode after testing.
- Whether any field adjustment is recorded.
If the light uses PIR, radar, or microwave motion sensing, keep the solar panel covered so the lamp remains in night mode. Walk in front of the sensor or wave your hand within the detection area. The light should increase brightness, then dim back after the programmed delay.
The most important rule is this:
Do not leave different lamps in different manual modes unless the project design requires it and the setting is recorded.
If the project uses a factory controller profile, the installer should confirm the response and then return the lamp to the required profile before pole lifting.
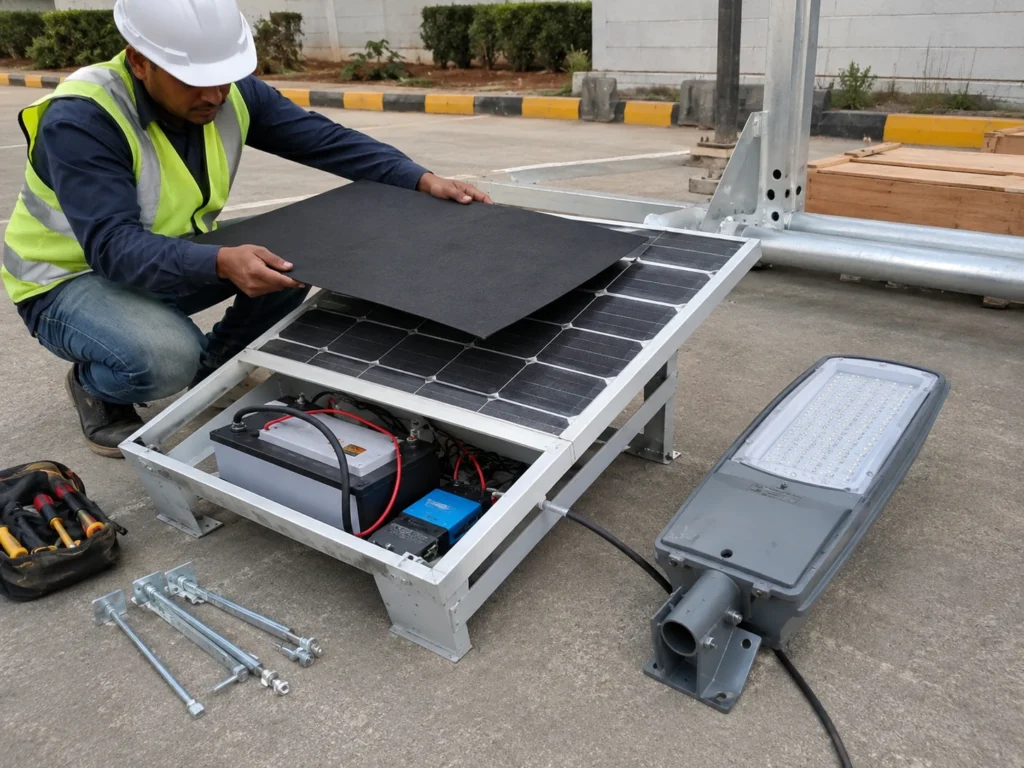
Step 7: Check Solar Panel Output and Waterproof Connectors
The solar panel should be checked before installation because it affects charging performance after handover.
A solar street light may pass a short LED test even if the solar panel connection is poor. The problem may only appear later when the battery cannot recharge properly.
Check the following:
- Solar panel connector is fully locked.
- Waterproof pin connectors are aligned correctly.
- Cable polarity and connection are correct.
- Cable route is protected from pulling or sharp edges.
- Panel surface is clean and not damaged.
- Panel frame and bracket are stable.
- Charging input can be detected if a test device is available.
- Panel direction will not be blocked by trees, walls, signs, or buildings after installation.
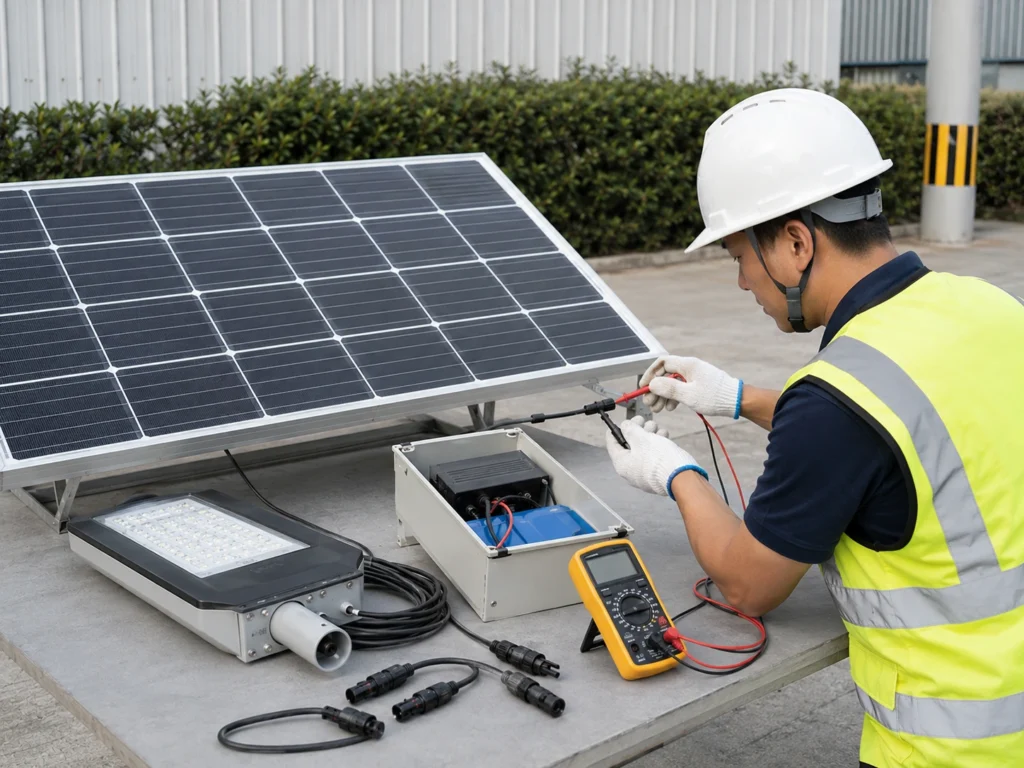
If trained technicians need to verify panel output, place the solar panel in direct, unshaded sunlight and use a multimeter set to DC voltage. The open-circuit voltage, often marked as Voc, should be reviewed against the panel specification. This check should follow supplier instructions and should not involve shorting connectors or opening sealed components.
If the panel is installed in a shaded position, the system may work during the first night but fail after several days because the battery is not receiving enough charge.
For road, campus, rural, and municipal projects, panel position should be reviewed together with the final site layout, not only with the product drawing.
Step 8: Review Cable, Connector, and Waterproof Details
Cable and connector problems are easy to miss before installation, but they can cause serious failures after handover.
Solar street lights often operate in outdoor environments with rain, dust, heat, wind, insects, and vibration. A loose connector or damaged cable may not fail during a quick test, but it can become a long-term maintenance problem.
Before pole lifting, check:
- Cable insulation is not damaged.
- Waterproof connectors are locked correctly.
- Cable route avoids sharp metal edges.
- Cable length is suitable for the pole and bracket.
- Connectors are not under tension.
- Exposed cable sections are protected.
- Control compartment is closed and sealed after testing.
For project teams, connector and cable checks should be included in the installation record. If water ingress appears later, it is often difficult to prove whether the problem came from product defect, installation error, or site damage.
Step 9: Restore Final Operating Mode Before Pole Lifting
After testing, the lamp must be restored to the correct final operating mode before pole lifting.
This step is easy to forget. Installers may test ON mode, change brightness, check Timer mode, or trigger sensor response, then install the light without restoring the approved project setting. The result may be inconsistent lighting across the project.
Before pole lifting, confirm:
- The lamp is not left in OFF mode.
- The lamp is not left in temporary ON mode.
- AUTO mode or the approved profile is selected.
- Timer settings match the project requirement.
- DIM level is not randomly changed.
- Sensor mode is enabled or disabled according to the project design.
- The final profile is recorded.
For large projects, the final controller profile should be confirmed by road section or installation zone. A main road, parking area, rural access road, and industrial access road may not require the same lighting logic.
Step 10: Record the Test Result Before Installation

A pre-installation test is much more useful when the result is recorded.
For one or two lamps, a simple note may be enough. For EPC, municipal, and multi-pole projects, the test record should be more structured because it supports later commissioning, handover, and maintenance.
A pre-installation test record helps the team track which lights have been checked before pole lifting.
| Record Item | What to Write |
|---|---|
| Project name | Name of project or site |
| Installation zone | Road section, parking area, campus zone, or project area |
| Pole number | Planned pole number or fixture number |
| Product model | Solar street light model or configuration |
| Battery status | Normal, low, needs recharge, or protection mode |
| Panel input | Normal, not tested, or abnormal |
| LED output | Normal, dim, flicker, no response, or abnormal |
| Remote response | Normal, no response, mismatch, or not required |
| Motion sensor response | Normal, abnormal, not tested, or not required |
| Final mode | AUTO, scheduled dimming, motion mode, or project profile |
| Issue note | Any abnormal condition found |
| Correction status | Corrected, pending, replaced, or supplier review required |
| Tester / supervisor | Person responsible for checking |
For EPC and municipal projects, this record should be kept with the full commissioning file. It can also support later handover and maintenance.
Common Problems Found During Pre-Installation Testing
Pre-installation testing often reveals small issues that are easier to solve before installation.
| Problem | Possible Cause | Suggested Action |
|---|---|---|
| Lamp does not turn on | Daylight detection, low battery, shipping mode, wrong connection | Cover panel, check battery, activate controller, review wiring |
| Remote does not respond | Wrong remote type, dead remote battery, too much distance, controller inactive | Check remote battery, distance, controller type, and activation |
| Lamp turns on but turns off quickly | Low battery or protection mode | Recharge battery and check system status |
| Brightness is lower than expected | DIM mode, low battery, wrong profile, protection logic | Confirm profile, battery status, and brightness setting |
| Motion sensor does not trigger | Sensor disabled, wrong mode, poor detection angle, daytime logic active | Confirm night mode, sensor setting, and detection area |
| Panel input not detected | Loose connector, wrong connection, damaged cable, poor sunlight | Check connector, cable, polarity, and panel condition |
| One batch behaves differently | Different controller profile or setting changed during test | Compare profile and restore approved setting |
| Light works on ground but not after installation | Mode changed, panel shading, connector movement, mounting issue | Recheck final mode, panel position, and cable connection |
The goal of this table is not to replace supplier instructions. It gives the site team a practical first check before assuming the product is defective.
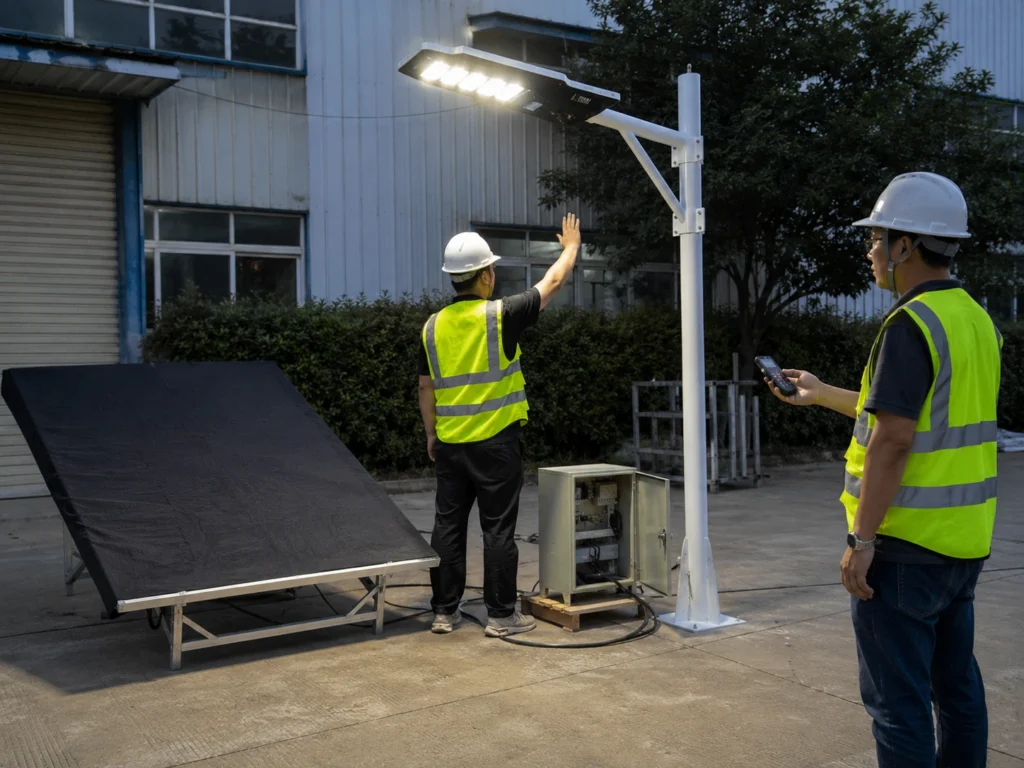
When Ground-Level Testing Is Not Enough
Ground-level testing is important, but it cannot confirm everything.
A solar street light may pass ground-level testing and still require further inspection after installation. Some issues only appear when the system is installed in the real site environment.
Ground-level testing is not enough when:
- The project requires consultant or municipal acceptance.
- Road lighting performance must meet a specific layout or brightness requirement.
- Pole height, spacing, and road width affect lighting uniformity.
- The project uses different dimming profiles by zone.
- The site has heavy shading, dust, coastal corrosion, or rainy-season risk.
- The project uses smart control or remote monitoring.
- A signed handover record is required.
In these cases, the ground-level test should be followed by night testing, zone review, handover records, and final commissioning.
For lighting performance review, Sunlurio can provide DIALux simulation outputs when the project requires layout verification before or after installation.
Request a Project-Ready Pre-Installation Test Checklist
Sunlurio can help EPC contractors, installation teams, and project distributors prepare a pre-installation test checklist for solar street lighting projects.
The checklist can be reviewed together with:
- Product datasheets.
- Installation drawings.
- BOQ and tender documents.
- Controller profile.
- Dimming schedule.
- Pole layout.
- Battery autonomy requirement.
- DIALux outputs if required.
- Commissioning and handover records.
To prepare a project-ready checklist, the project team can share the pole height, road or site type, quantity, product configuration, controller profile, battery autonomy requirement, and handover document requirement.
If your project includes multiple solar street lights, different road sections, or municipal handover requirements, testing before pole installation can reduce rework and help the project team control installation quality from the beginning.
Related Engineering Support
For project teams preparing solar street light installation and testing documents, these resources may be useful:
- Solar street light commissioning checklist
- Basic remote control setup steps
- Engineering support for solar street lighting
- Datasheets and installation drawings
- BOQ and tender document support
- DIALux simulation outputs
FAQ
Should solar street lights be tested before pole installation?
Yes. Solar street lights should be tested before pole installation because battery, controller, LED output, remote response, panel input, and wiring problems are easier to correct on the ground. This reduces rework after the fixture is mounted on the pole.
How do you test a solar street light before installation?
Start by assembling the lamp, solar panel, battery, controller, cables, and connectors on the ground. Then check battery status, cover the solar panel to simulate night, confirm LED output, test remote or motion sensor response, restore the final operating mode, and record the result before pole lifting.
What is the cover-and-uncover test for solar street lights?
The cover-and-uncover test checks whether the controller, photocell, or daylight sensor switches correctly between day and night logic. Cover the solar panel fully to simulate night and confirm that the light turns on. Then uncover the panel and confirm that the light turns off or returns to charging mode.
Why does a solar street light not turn on during daytime testing?
Many solar street lights do not turn on during daytime because the controller detects sunlight through the solar panel. To test the lamp, the installer may need to cover the solar panel fully to simulate night conditions.
Can solar street lights be tested indoors before installation?
Yes, some basic function tests can be done indoors if the battery, controller, LED output, and remote response can be checked safely. However, indoor testing cannot confirm real solar charging performance, panel orientation, shading risk, or night operation after installation. Outdoor site testing and final commissioning are still needed for project handover.
Is remote control testing enough before pole installation?
No. Remote control testing only confirms basic controller response. A full pre-installation test should also check battery status, solar panel input, LED output, wiring, connector condition, photocell response, motion sensor function, controller mode, and final project profile.
How long does pre-installation testing take for each solar street light?
The time depends on the product type, controller logic, test tools, and project record requirement. A basic function test may only take a few minutes, but EPC or municipal projects should allow extra time for battery status review, controller profile confirmation, panel input check, final mode restoration, and test record completion.
Can a multimeter be used to test solar street lights before installation?
Yes, trained technicians may use a multimeter set to DC voltage to check solar panel output or basic electrical status according to supplier instructions. The open-circuit voltage, often marked as Voc, should be reviewed against the panel specification. Do not short connectors, reverse polarity, open sealed battery packs, or modify wiring during a basic site test.
What should be recorded before pole lifting?
The project team should record the pole number, product model, battery status, panel input, LED response, remote response, motion sensor response, final mode, issue note, correction status, and tester or supervisor confirmation.
Why does a solar street light work on the ground but fail after installation?
Possible reasons include panel shading, connector movement during installation, wrong final mode, low battery, loose wiring, sensor interference, or mounting direction problems. This is why ground testing should be followed by installation review and night commissioning.
Can one sample test represent the whole project?
For a small project, sample testing may be acceptable if agreed by the project team. For EPC, municipal, and multi-pole projects, testing should be more systematic because different batches, controller settings, or site zones may behave differently.
What is the difference between pre-installation testing and commissioning?
Pre-installation testing checks whether each light is ready to be installed. Commissioning checks whether the installed lighting system is ready for project handover. Commissioning includes night operation, controller profile confirmation, zone consistency, and handover records.
What documents are useful during pre-installation testing?
Useful documents include the product datasheet, installation drawing, BOQ, pole layout, controller profile, dimming schedule, and commissioning record. These documents help the installation team compare the tested system with the approved project requirement.
