
Quick Answer
A solar street light commissioning checklist should cover project documents, ground-level testing, battery and solar panel verification, controller profile confirmation, pole and mounting review, night lighting test, and handover records.
For EPC contractors, municipal project teams, installation companies, and project distributors, commissioning is not only about checking whether the lamp turns on. It is the process of confirming that each solar street light matches the approved design, operates under the correct controller profile, performs correctly at night, and has clear records before project handover.
A practical commissioning checklist should help answer these questions:
- Does the installed system match the approved datasheet, BOQ, drawing, and project layout?
- Was each lamp tested before pole lifting?
- Is the battery charged enough for activation and night operation?
- Is the solar panel installed without serious shading or wrong orientation?
- Is the controller profile consistent across the project zone?
- Does the lighting output match the road, parking, campus, or industrial site condition?
- Are pole numbers, test results, issue notes, and correction records documented before final acceptance?
For larger solar street lighting projects, commissioning is the step that protects the project team from rework, inconsistent lighting, battery autonomy complaints, and handover disputes.
Project Review Summary
| Item | Project Review Point |
|---|---|
| Main topic | Solar street light commissioning checklist |
| Best-fit buyers | EPC contractors, municipal project teams, installation companies, project distributors, and tender buyers |
| Best-fit projects | Road lighting, municipal streets, campus roads, parking areas, industrial zones, rural access roads, and multi-pole solar lighting projects |
| Key decision factors | Project documents, battery condition, solar panel input, controller profile, mounting quality, night performance, and handover records |
| Required documents | Datasheet, BOQ, installation drawing, pole layout, controller profile, DIALux output if required, and commissioning record |
| Common mistake | Treating “the lamp turns on” as proof that the project is ready for handover |
| Recommended next step | Review the commissioning checklist together with datasheets, drawings, BOQ, controller profile, and lighting layout before final acceptance |
What This Guide Covers
This guide explains how EPC contractors, municipal project teams, and installation companies can review solar street lights before final handover. It focuses on the practical checks that matter after the products arrive on site and before the project is accepted.
It does not replace local engineering approval, electrical safety rules, or project-specific tender requirements. Instead, it gives project teams a clear commissioning framework for checking documents, lamps, batteries, solar panels, controllers, poles, mounting quality, night performance, and handover records.
For projects that need datasheets, installation drawings, BOQ references, DIALux outputs, or controller profile review, Sunlurio’s engineering support for solar street lighting can help prepare the technical documents before site work starts.
Commissioning vs Installation vs Maintenance vs Troubleshooting
Commissioning is different from installation, maintenance, and troubleshooting. These terms are often mixed together, but they happen at different stages of a solar street lighting project.
| Term | Main Purpose | When It Happens | Main Focus |
|---|---|---|---|
| Installation | Put the system in place | During site work | Pole, bracket, panel, luminaire, cable, and mounting |
| Commissioning | Confirm the system is ready for handover | Before acceptance | Battery, controller profile, night test, records, and project consistency |
| Maintenance | Keep the system working after handover | After operation starts | Cleaning, battery health, inspection, fasteners, and replacement planning |
| Troubleshooting | Find and fix a specific problem | When failure appears | No light, dim light, short runtime, sensor issue, charging problem, or controller response |
This distinction is important. A solar street light may be installed correctly but still fail commissioning if the controller profile is wrong, the battery is not charged enough, the panel is shaded, or the handover record is missing.
For EPC projects, installation quality and commissioning quality should be reviewed together. A good-looking installation is not enough if the system has not been tested against the project requirement.
Recommended Commissioning Sequence
A solar street light commissioning process should follow a clear sequence. This helps the team find problems early and avoid repeating the same checks after the poles are already installed.
- Review project documents before site work.
- Test each lamp at ground level before pole lifting.
- Confirm battery, solar panel, and controller status.
- Install the pole, bracket, luminaire, solar panel, and cable.
- Check mounting direction, cable sealing, fasteners, and pole condition.
- Confirm AUTO mode, remote response, and final controller profile.
- Run a night test by road section or project zone.
- Record pole number, test result, issue note, and correction status.
- Submit handover records before final acceptance.
This sequence is especially useful for multi-pole projects because it separates product response, installation quality, lighting performance, and handover documentation into clear steps.
Checklist 1: Documents and Project Inputs Before Site Work

Commissioning should begin before the team reaches the site. The project documents must be clear enough for the installation team to know what they are checking.
Before installation starts, the project team should confirm these inputs:
| Document or Input | Why It Matters |
|---|---|
| Product datasheet | Confirms lamp power, solar panel, battery, controller, protection level, and system configuration |
| Installation drawing | Shows pole height, bracket layout, panel mounting, cable path, and mounting details |
| BOQ or tender specification | Confirms whether the delivered system matches the project requirement |
| Controller profile | Defines operating mode, dimming schedule, motion logic, and protection behavior |
| DIALux or lighting simulation output | Helps compare actual lighting performance with design expectation |
| Pole layout or zone list | Helps identify which settings apply to each road section or area |
| Project handover requirement | Defines what records must be submitted before acceptance |
If these documents are missing, unclear, or inconsistent, the installation team may rely on guesswork. That is where many project problems begin.
For example, if the BOQ requests a fixed night lighting schedule but the field team randomly changes dimming settings by remote control, different poles may behave differently after handover. If the layout requires different settings for a main road and a parking area, the pole list should clearly show which profile belongs to which zone.
For tender and project documentation, Sunlurio can support datasheets and installation drawings as well as BOQ and tender document support.
Checklist 2: Ground-Level Test Before Pole Installation
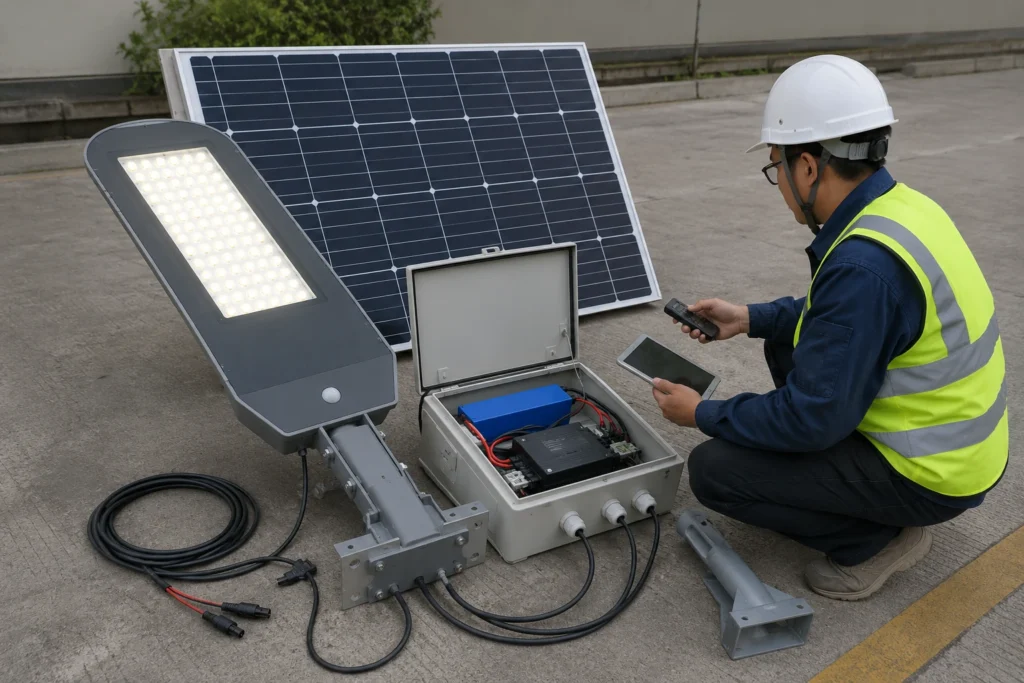
Ground-level testing should be completed before the lamp is lifted onto the pole. Problems are much easier to correct on the ground than after the fixture is installed at 6, 8, 10, or 12 meters.
A practical ground-level test should check:
- Whether the lamp body, solar panel, battery pack, bracket, and cable are complete.
- Whether the battery has enough charge for activation and testing.
- Whether the controller is awake and not still in shipping or protection mode.
- Whether the LED module turns on correctly.
- Whether the solar panel input can be detected.
- Whether the remote or local control tool can trigger the expected response.
- Whether the final operating mode is restored after testing.
For some solar street lights, the system may not turn on during daytime unless the solar panel is covered to simulate night. This does not always mean the lamp is broken. It may simply mean the controller is detecting daylight and preventing night operation. The installer should follow the supplier’s test logic instead of repeatedly pressing buttons without understanding the controller behavior.
For basic button functions and setup steps, see Sunlurio’s guide to basic remote control setup steps. For project commissioning, however, remote response should only be treated as one part of the full checklist.
Checklist 3: Battery, Panel, and Controller Verification
The battery, solar panel, and controller must be checked together because solar street light performance depends on the complete system, not only the lamp wattage.
A solar street light may fail after installation even when the LED fixture is normal. Common causes include low battery charge, insufficient solar panel input, incorrect controller mode, shading, aggressive dimming settings, or low-voltage protection.
Before handover, the commissioning team should check the battery, panel, and controller as one system.
Battery Status
The battery should have enough charge for testing and early operation. If the battery is too low, the controller may enter protection mode to prevent deep discharge. In that case, the lamp may not respond normally until the battery is recharged.
For project sites, the team should confirm:
- Battery voltage or state-of-charge condition.
- Whether the battery pack matches the project specification.
- Whether the battery connector is secure.
- Whether the battery compartment is sealed correctly.
- Whether the system has entered low-voltage protection.
- Whether the battery autonomy is suitable for the local weather pattern.
Battery autonomy should not be judged only by one clear night of testing. For rainy-season, tropical, dusty, or remote-area projects, the battery, solar panel, LED output, and dimming profile should be reviewed together.
Solar Panel Input
The solar panel is not only a charging component. Its orientation, tilt, shading condition, and cable connection directly affect night performance.
The commissioning team should check:
- Panel direction and tilt.
- Shading from trees, walls, signs, buildings, or nearby poles.
- Panel surface cleanliness.
- Connector condition.
- Cable routing and protection.
- Whether panel voltage or charging input can be detected.
In tropical, dusty, coastal, or rainy-season markets, panel performance should not be judged only under ideal sunlight. A system that works well during sunny days may still fail if the panel is undersized, shaded, or installed at a poor angle.
Controller Behavior
The controller decides how the system charges, discharges, dims, protects the battery, and responds to sensor or remote commands. It should not be treated as a small accessory.
During commissioning, check whether:
- The controller is correctly connected.
- The system has been activated after transport.
- The factory profile matches the project requirement.
- AUTO mode or scheduled dimming works as expected.
- Motion sensor logic is suitable for the site.
- Low-voltage protection behavior is understood by the project team.
- Any field adjustment is recorded.
If the controller profile is not controlled, two identical-looking solar street lights may operate differently after installation.
Checklist 4: Remote Response, AUTO Mode, and Controller Profile Confirmation
Remote response confirms that the controller can receive commands, but it does not prove that the whole project has been commissioned correctly.
For a single lamp or a small site, remote testing can be useful. The installer can check whether the lamp turns on, whether AUTO mode responds, whether dimming changes are accepted, and whether the sensor mode works. For EPC and municipal projects, this is only the starting point.
The commissioning team should confirm:
- What is the approved final operating mode?
- Does AUTO mode include a factory dimming schedule?
- Is Radar / PIR mode required for this project, or only for specific zones?
- Is Timer mode suitable for the road section?
- Are all poles in the same zone using the same controller profile?
- Were any manual adjustments made on site?
- Were these adjustments recorded before handover?
A common mistake is allowing different installers to adjust different poles by remote control without recording the final setting. This may not create a visible problem on the first night, but it can cause inconsistent brightness, different shutdown times, and difficult maintenance later.
For project-scale systems, the preferred method is to confirm the controller profile before delivery or before installation, then use the remote only for activation, testing, or controlled adjustment.
If the project needs different control logic by road type, zone, or traffic pattern, the team should review the final controller profile together with the project’s solar street light product configurations before production or shipment.
Checklist 5: Pole, Bracket, Cable, and Mounting Review
A solar street light can have the correct electrical configuration but still perform poorly if the mounting details are wrong.
The pole, bracket, panel, and cable path affect safety, charging performance, light distribution, and long-term maintenance. Commissioning should include a visual and practical installation review.
Check the following items:
| Item | What to Check | Why It Matters |
|---|---|---|
| Pole verticality | Whether the pole is upright and stable | A leaning pole affects safety, appearance, and lighting direction |
| Bracket direction | Whether the luminaire points toward the required road or area | Wrong direction creates dark zones or wasted light |
| Solar panel position | Whether the panel receives enough sun exposure | Poor panel position reduces charging |
| Cable protection | Whether cables are protected from pulling, cutting, water, and UV exposure | Cable damage can cause early failure |
| Connector sealing | Whether connectors are waterproof and properly locked | Poor sealing can cause water ingress |
| Fasteners | Whether bolts and brackets are tightened | Loose mounting creates safety and vibration risk |
| Foundation or mounting base | Whether the pole support is stable and suitable for site conditions | Weak support increases long-term structural risk |
This part should not be skipped just because the lamp turns on. Many project complaints come from installation details rather than LED failure.
If the project also includes new poles, foundations, or replacement work, the commissioning review should be checked together with the project’s light pole foundation design basics to avoid separating electrical performance from structural installation risk.
Checklist 6: Night Test and Lighting Performance Review
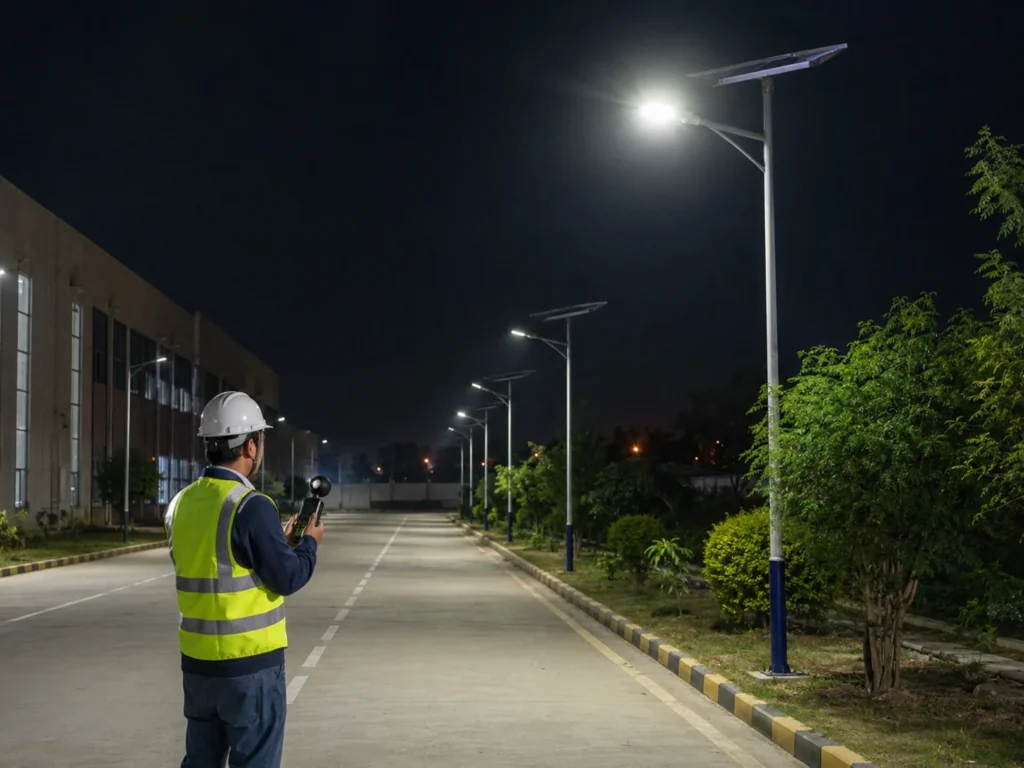
A night test is necessary because some problems only appear during real operating conditions.
Daytime activation is useful for basic testing, but it does not show whether the system can operate through the night, whether the dimming schedule is correct, or whether the road section receives acceptable lighting.
During the night test, check:
- Whether the lights turn on automatically at dusk.
- Whether the first lighting period reaches the expected brightness.
- Whether dimming changes happen at the correct time.
- Whether motion sensor response is suitable, if used.
- Whether different poles in the same zone behave consistently.
- Whether there are visible dark areas between poles.
- Whether any lamp shuts down earlier than others.
- Whether nearby lights or reflective surfaces interfere with sensors.
- Whether the installed layout matches the design assumption.
For road, highway, parking, campus, industrial, port, and municipal projects, lighting performance should be reviewed against the project requirement, not only by visual impression. If the project uses a lighting simulation, the commissioning team should compare the installed condition with the expected design logic.
Sunlurio can provide DIALux simulation outputs and road lighting review support when the project requires lighting layout verification.
Checklist 7: Handover Records for EPC and Municipal Projects
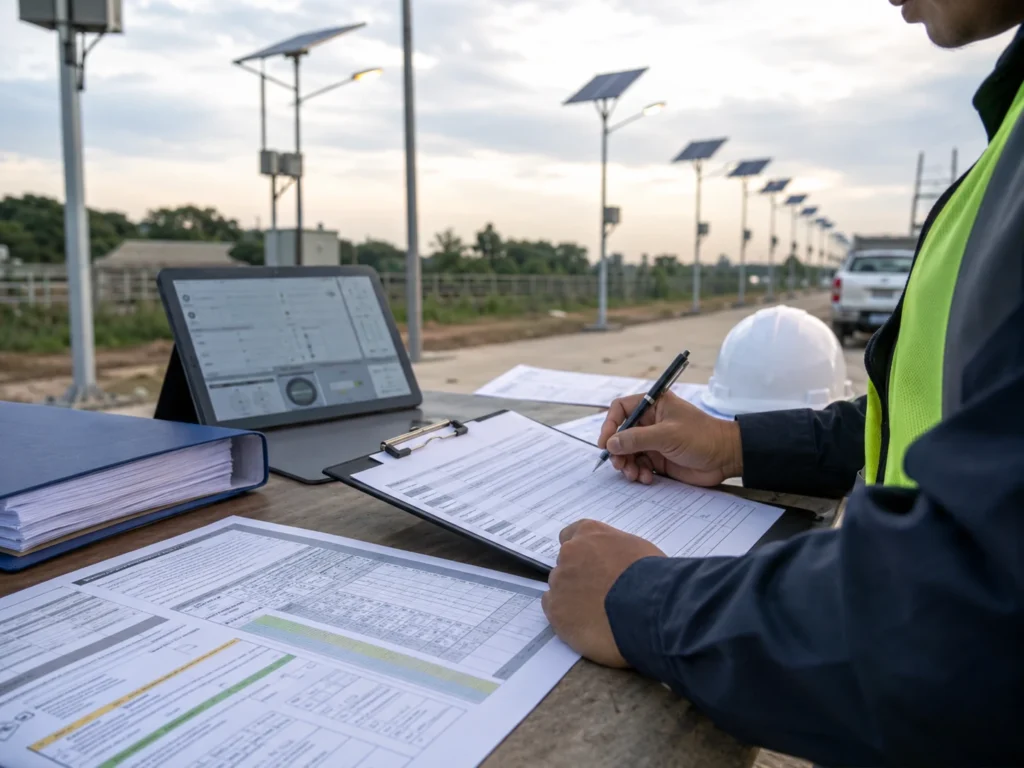
Handover records are important because they turn site testing into traceable project evidence.
Without records, the project team may know that the lights were tested, but they cannot prove which pole was checked, which controller profile was used, what issue was found, or whether the problem was corrected. This becomes a major problem when a municipal client, contractor, or maintenance team reviews the project later.
A basic solar street light commissioning record should include:
| Record Item | Why It Matters |
|---|---|
| Project name and site zone | Helps separate different road sections or installation areas |
| Pole number | Makes future maintenance and issue tracking easier |
| Product model | Confirms the installed product matches the project list |
| Battery status | Shows whether the system was ready before handover |
| Solar panel direction | Helps evaluate charging condition |
| Controller profile | Prevents confusion about operating mode and dimming logic |
| Remote response result | Confirms basic command response during commissioning |
| Night test result | Confirms actual operation after dusk |
| Issue note | Records abnormal behavior or installation concern |
| Correction status | Shows whether the issue was solved before handover |
| Installer or supervisor confirmation | Supports responsibility and project acceptance |
For EPC teams, this record is not only paperwork. It helps reduce disputes after handover and gives maintenance teams a clear starting point if problems appear later.
Basic Acceptance Criteria Before Handover
Before final handover, the project team should agree on basic acceptance criteria. This helps avoid unclear judgments such as “it looks bright enough” or “the lamp turned on once.”
| Check Item | Pass Condition | If Not Passed |
|---|---|---|
| Product match | Model and configuration match BOQ or approved datasheet | Hold handover and confirm supply record |
| Battery status | Battery has enough charge for activation and night operation | Recharge or check low-voltage protection |
| Panel input | Panel receives sunlight without major shading | Adjust panel direction or remove shading risk |
| Controller profile | Final mode matches approved dimming schedule | Restore correct profile and record setting |
| Mounting quality | Pole, bracket, fasteners, and cables are secure | Correct before night test |
| Night operation | Lights turn on, dim, and operate consistently by zone | Record issue and retest after correction |
| Handover record | Pole number, test result, and issue status are documented | Complete record before acceptance |
This table should be adapted to the tender, consultant requirement, local road lighting standard, and project contract. For large municipal or public road projects, the acceptance criteria should be confirmed before mass installation, not after the full site is already completed.
When a Basic Commissioning Checklist Is Not Enough
A basic commissioning checklist may not be enough when the project involves consultant approval, public road lighting acceptance, high-pole installation, smart control integration, coastal corrosion risk, desert dust exposure, or strict tender documentation.
In these cases, project teams may also need:
- DIALux or Relux lighting simulation review.
- IES or LDT photometric files.
- Pole and foundation review.
- Controller profile approval before shipment.
- Sample pole testing before mass installation.
- Night inspection records by zone.
- Signed handover documents.
- Maintenance responsibility records.
- Smart control platform configuration records, if used.
This does not mean every project needs a complicated acceptance package. A small parking area and a municipal road project should not be treated the same way. The checklist should match the project size, risk level, contract requirement, and maintenance responsibility.
Common Commissioning Mistakes to Avoid
The most common commissioning mistake is assuming that “the light turns on” means the project is ready for handover.
For solar street lighting projects, that is not enough. A short lighting test cannot confirm battery autonomy, charging performance, long-term controller behavior, or zone consistency.
Here are the mistakes project teams should avoid:
1. Testing Only After the Pole Is Installed
If a controller, battery, connector, or LED problem is found after the lamp is already mounted, correction becomes more expensive and slower. Ground-level testing should happen before pole lifting.
2. Leaving Lamps in the Wrong Mode After Testing
Installers may press ON, OFF, Timer, or manual dimming buttons during testing and forget to return the lamp to the required final profile. This can cause inconsistent operation after handover.
3. Using 100% Brightness Without Checking Autonomy
Full brightness may look better during a short demonstration, but it can reduce runtime and increase battery stress if the system was not designed for that load.
4. Ignoring Solar Panel Shading
A lamp may work during installation, but if the solar panel is shaded during peak sunlight hours, charging will be reduced. This often appears later as short runtime or rainy-season failure.
5. Treating All Zones the Same
Main roads, rural roads, parking areas, industrial roads, and security zones may need different lighting logic. Applying one random setting to every pole can create performance problems.
6. Not Recording Controller Profiles
If the controller settings are not recorded, later troubleshooting becomes difficult. Maintenance teams may not know whether a lamp is failing or simply operating under a different profile.
7. Skipping Night Verification
A daytime test can confirm basic response, but it cannot confirm the real night schedule, dimming behavior, sensor response, or lighting consistency across the site.
When Remote Control Is Not Enough for Project-Scale Systems
Handheld remote control is useful for setup and local testing, but it is not enough for every solar street lighting project.
For small projects, remote control can be practical. The team can activate lamps, confirm AUTO mode, adjust brightness, or test motion response. For larger projects, especially 50, 100, or 500 poles, relying only on handheld remote control creates management risks.
Remote-only control becomes weak when the project needs:
- Unified settings across many poles.
- Different profiles for different zones.
- Maintenance records.
- Remote alarm checking.
- Batch dimming adjustment.
- Performance monitoring.
- Clear responsibility after handover.
- Reduced site visits.
In those cases, project teams may need a more structured controller profile or a smart lighting system. Smart control is not necessary for every project, but it becomes valuable when long-term operation, monitoring, and maintenance traceability are important.
For larger municipal or infrastructure projects, Sunlurio can review whether the project is better suited to standard controller profiles or smart street lighting system design.
Need a Project-Ready Commissioning Checklist?
Sunlurio can help prepare a solar street light commissioning record for EPC, municipal, road, campus, parking, and industrial lighting projects. The checklist can be reviewed together with datasheets, BOQ, controller profiles, pole layout, DIALux outputs, and handover requirements before site acceptance.
A project-ready commissioning checklist can help your team confirm:
- Which documents should be reviewed before site work.
- Which tests should be completed before pole lifting.
- Which controller profile should be used by project zone.
- Which records should be submitted before handover.
- Which issues should be corrected before final acceptance.
If your project involves multi-pole solar street lighting, tender documentation, municipal acceptance, or site-specific lighting performance requirements, Sunlurio can support the technical review before installation and handover.
Related Engineering Support
For project teams preparing solar street lighting documents, these resources may be useful:
- Engineering support for solar street lighting
- Datasheets and installation drawings
- BOQ and tender document support
- DIALux simulation outputs
- Solar street light product configurations
- Basic remote control setup steps
FAQ
What is solar street light commissioning?
Solar street light commissioning is the process of checking whether the installed lighting system works according to the project requirement before handover. It includes battery condition, solar panel input, controller profile, remote response, dimming schedule, installation quality, night operation, and test records.
Should solar street lights be tested before pole installation?
Yes. Solar street lights should be tested before pole installation because problems are easier to solve on the ground. The team should check battery status, controller activation, LED output, panel input, remote response, and final operating mode before lifting the lamp onto the pole.
Is remote control testing enough for solar street light commissioning?
No. Remote control testing only confirms basic command response. A full commissioning check should also review battery charge, solar panel charging condition, controller profile, dimming schedule, mounting quality, night performance, and handover records.
What should EPC teams record during solar street light commissioning?
EPC teams should record project zone, pole number, product model, controller profile, battery status, panel orientation, selected operating mode, night test result, issue notes, correction status, and supervisor confirmation. These records help with project acceptance and later maintenance.
What is the difference between solar street light commissioning and installation?
Installation means the solar street light is physically mounted on site. Commissioning means the installed system is tested and confirmed before handover. Commissioning focuses on controller settings, battery status, solar panel input, night operation, project records, and acceptance readiness.
What should be included in a solar street light handover checklist?
A handover checklist should include project zone, pole number, product model, battery status, panel direction, controller profile, remote response, night test result, issue notes, correction status, and supervisor confirmation. For tender projects, it may also include datasheets, drawings, BOQ records, and DIALux outputs.
Why do some solar street lights work during testing but fail after installation?
Common reasons include low battery charge, wrong controller mode, panel shading, poor connector sealing, incorrect wiring, sensor interference, or settings changed after ground testing. This is why commissioning should include both ground-level testing and night verification.
Can all solar street lights use the same commissioning checklist?
No. The basic logic is similar, but the checklist should be adjusted by project type. A highway, rural road, parking area, industrial zone, and municipal street may have different pole height, lighting requirement, dimming profile, battery autonomy, and handover standard.
When should a project use smart control instead of handheld remote control?
Smart control is more suitable when the project has many poles, several control zones, remote maintenance needs, batch dimming requirements, alarm monitoring, or long-term municipal operation. Handheld remotes are useful for setup, but they are limited for traceability and large-scale management.
What documents should be prepared before solar street light commissioning?
Project teams should prepare the datasheet, installation drawing, BOQ, pole layout, controller profile, dimming schedule, battery autonomy requirement, and lighting simulation output if available. These documents help the site team check whether the installed system matches the project design.
