
Choosing the right light pole height and dimensions is not only a visual decision. In real outdoor lighting projects, it affects lighting coverage, glare control, wind resistance, structural safety, installation cost, and long-term maintenance risk.
A pole that is too short may create dark zones and poor uniformity. A pole that is too tall may increase glare, overspill, structural demand, and unnecessary project cost. The right choice depends on the application, luminaire type, site layout, wind exposure, and project-review requirements.
For EPC contractors, municipalities, consultants, and project buyers, light pole selection should be treated as an engineering and project-fit decision, not only as a catalog choice.
Quick Answer
To choose the correct height and dimensions of light poles, start with five core inputs:
- application type
- area size and layout
- luminaire and bracket load
- wind and environmental exposure
- local standards or project requirements
As a practical starting point:
- 3–6 m poles are commonly used for pathways, gardens, and smaller pedestrian areas
- 6–9 m poles are often used for parking areas, estates, and medium-scale roads
- 9–12 m poles are commonly used for municipal roads and wider traffic routes
- 12 m and above are more likely for larger roads, high-load applications, or special lighting layouts
But these are only screening ranges, not final design rules.
The correct pole dimensions should always be checked together with:
- pole height
- shaft diameter and taper
- wall thickness
- base-plate size
- arm length
- fixture weight and projected area
- foundation logic
Need help matching pole height, dimensions, and lighting layout for a road, parking lot, estate, or public project?
Explore Solutions
Request Engineering Support (24H)
Why Pole Height and Dimensions Matter
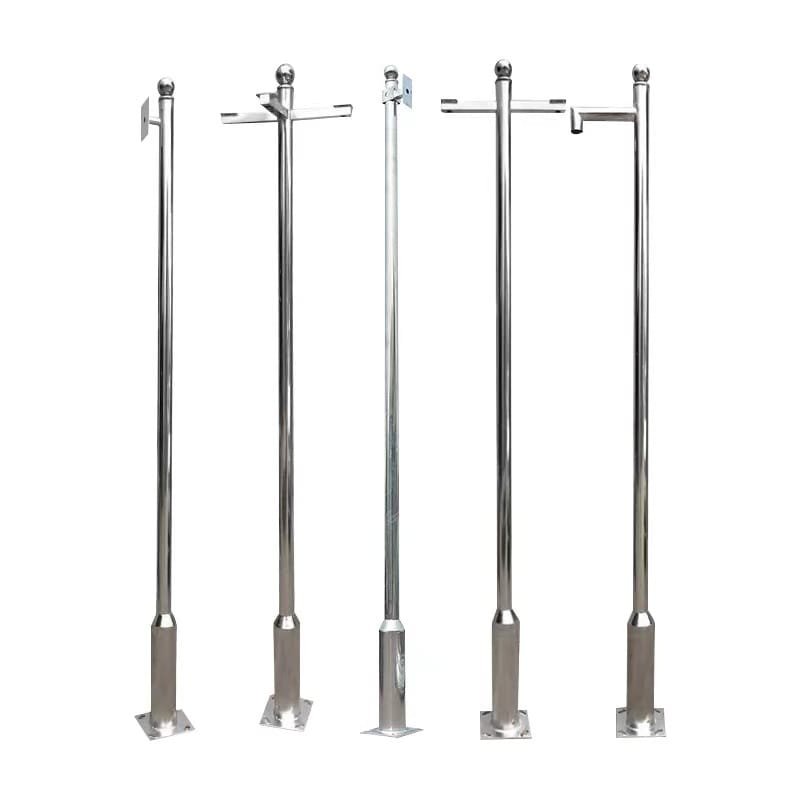
ALT: stainless steel outdoor light pole used in a public lighting application
Caption: Pole height and section size affect not only appearance, but also coverage, structural loading, and lifecycle performance.
The height and dimensions of a light pole influence more than appearance. In practical projects, they directly affect:
1. Illumination Coverage
If a pole is too short, the result may be:
- smaller light footprint
- more dark areas between poles
- poor uniformity
- the need for more poles and fixtures
If a pole is too tall, the project may face:
- wasted light outside the target area
- more glare
- lower useful intensity on the ground
- unnecessary structural cost
2. Structural Safety and Durability
As pole height increases, structural demand usually increases as well. Wind pressure, bracket length, fixture size, and mounting load all become more important.
That means taller poles often require:
- stronger shaft dimensions
- heavier wall thickness
- larger base plates
- more robust foundations
3. Cost Efficiency
Over-specifying a pole can increase:
- material cost
- transport cost
- installation effort
- foundation size
- long-term replacement cost
Under-specifying it can create:
- instability
- premature wear
- review rejection
- higher maintenance risk
That is why the goal is not to choose the tallest or strongest option. It is to choose a pole that matches the project correctly.
Step 1: Start With the Application
Different lighting applications usually point to different pole-height ranges.
Street and Road Lighting
For many public roads, 9–12 m is a common starting range because it can support broader coverage and better spacing efficiency.
This is often relevant for:
- municipal roads
- arterial roads
- wider estate roads
- industrial access roads
Parking Lots and Open Compounds
For parking lots and medium-size open areas, 6–9 m is often a practical range because it balances area coverage and glare control.
Pathways, Gardens, and Decorative Areas
For pedestrian spaces, decorative projects, and smaller landscaped areas, 3–6 m is often more suitable.
Larger Open Areas and Special Applications
For sports fields, high-load floodlighting, or larger industrial areas, heights may go beyond 12 m, but these applications usually need more formal structural and lighting review.
Step 2: Review Area Size and Layout
Pole selection depends not only on the type of site, but also on the layout.
A larger area may justify taller poles because they can reduce the number of lighting points.
A narrower or more confined area may perform better with shorter poles and more controlled optics.
The project should review:
- road width
- carriageway and sidewalk arrangement
- pole spacing
- mounting side or center arrangement
- nearby buildings or obstructions
- glare sensitivity in the surrounding area
For project layouts that need stronger review support, it is usually better to evaluate pole height together with the lighting design rather than separately.
Step 3: Match Pole Height to Luminaire and Bracket Load
Pole selection should always consider what the pole is actually carrying.
That includes:
- fixture weight
- projected area of the luminaire
- bracket outreach length
- number of luminaires
- cameras, banners, or smart devices if included
A lighter decorative fixture and a large roadway fixture do not create the same structural demand.
Longer outreach arms also increase bending moment, which means pole diameter, wall thickness, and base design become more important.
Step 4: Check Pole Dimensions, Not Height Alone
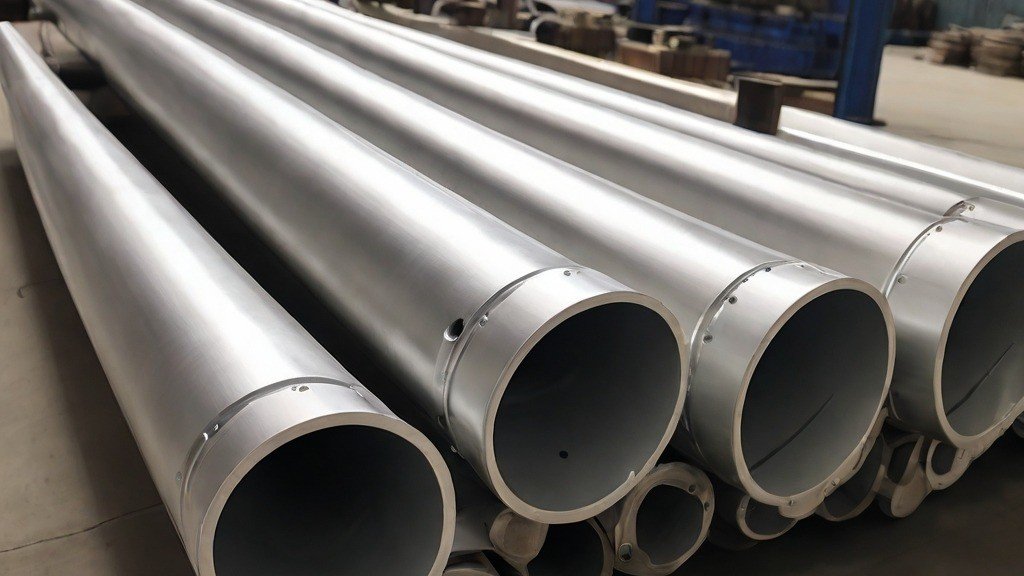
ALT: outdoor lighting pole dimensions and finished pole reference for engineering selection
Caption: Pole height should always be reviewed together with diameter, wall thickness, base plate, and mounted load.
A common mistake is to choose pole height first and assume the rest of the dimensions are secondary.
In fact, the pole dimensions usually matter just as much.
Pole Shaft Diameter
Diameter affects the pole’s ability to resist bending and vibration. Taller poles or higher-load applications often require larger diameters.
Wall Thickness
Wall thickness affects:
- structural margin
- wind resistance
- corrosion allowance
- long-term durability
Base Plate and Anchor Arrangement
Base-plate size and anchor-bolt coordination influence how the pole transfers loads into the foundation.
Material Choice
The most common materials include:
- steel — strong, durable, and widely used
- aluminum — lighter and naturally corrosion-resistant, often useful in humid or coastal environments
Material choice should be reviewed together with environment, corrosion risk, cost, and structural demand.
Step 5: Check Wind and Environment
Wind exposure is one of the most important structural inputs in pole selection.
Taller poles face more wind pressure, especially when combined with:
- larger luminaires
- longer brackets
- banners or accessories
- open-site exposure
Environmental conditions also matter.
For example:
- coastal sites may need stronger corrosion resistance
- humid areas may increase long-term surface risk
- dusty or industrial locations may increase maintenance demand
- high-exposure roads may need stronger structural margin
This is why pole height and dimensions should be reviewed together with the actual site conditions, not only a generic catalog table.
Typical Height Guide by Application
The table below is a practical starting reference, not a substitute for formal engineering review.
| Application | Typical Pole Height | Main Design Concern |
|---|---|---|
| Pathways / gardens | 3–6 m | ambient lighting, glare control, appearance |
| Parking lots / estates | 6–9 m | area coverage, spacing, moderate structural demand |
| Municipal roads | 9–12 m | wider coverage, spacing efficiency, wind and arm load |
| Industrial roads / larger sites | 10–12 m+ | heavier fixtures, stronger structural demand |
| Sports or special applications | 12–20 m | formal structural and lighting review usually required |
Balancing Practical Needs and Aesthetics
Lighting poles are visible infrastructure, so appearance still matters. But it should come after technical fit, not before it.
Design and Finish
The pole finish should suit both the environment and the visual context.
Examples include:
- galvanized steel for structural durability
- powder-coated finishes for additional appearance and surface protection
- aluminum finishes where lower corrosion risk and cleaner appearance are priorities
Color and Style
Neutral colors such as black, grey, or bronze usually fit most public environments. Decorative or custom finishes may be more suitable for landscape, heritage, or premium urban projects.
Decorative Elements
Decorative additions can improve appearance, but they may also affect cost, wind load, and maintenance. These should be treated as part of the full design, not as purely visual extras.
Standards and Local Requirements
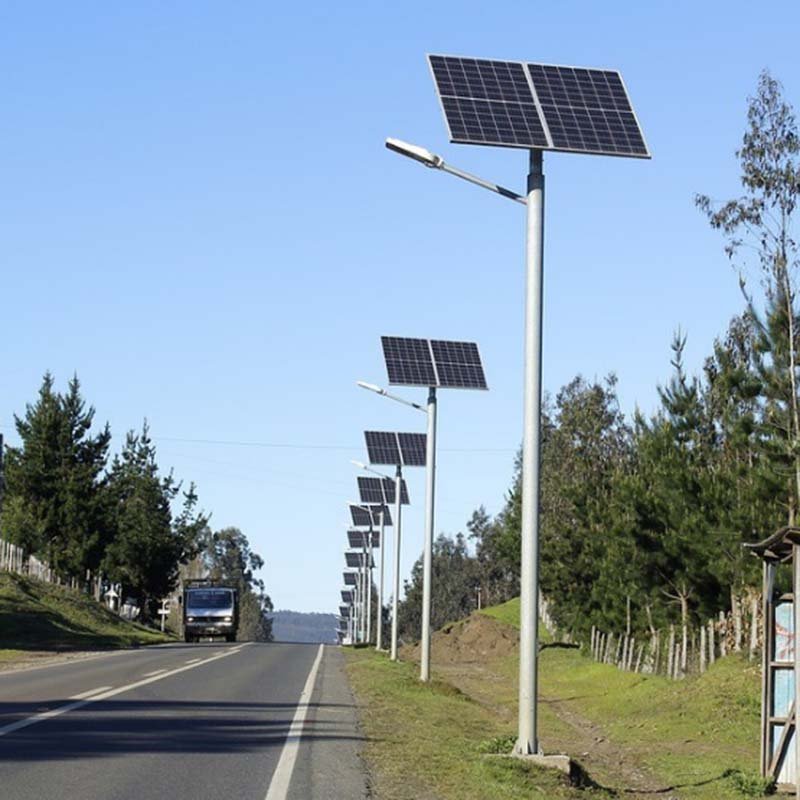
ALT: solar street lights installed in an outdoor road and public infrastructure environment
Caption: Pole height and dimensions should align with site layout, lighting performance targets, and applicable structural or local review requirements.
Pole selection should also reflect the standards or project requirements that apply to the site.
Depending on the market and tender, this may include:
- local zoning or municipal rules
- structural design requirements for poles
- roadway or area-lighting requirements
- environmental and corrosion expectations
- project-specific consultant or utility standards
For many projects, structural reference frameworks such as EN 40, related pole standards, or local engineering requirements may apply. In practical terms, buyers should check whether the selected pole is supportable under the project’s actual loading and review conditions. :contentReference[oaicite:1]{index=1}
Common Mistakes When Choosing Pole Height and Dimensions
Choosing by Height Only
Height alone is not enough. The shaft dimensions, wall thickness, base plate, and arm length also matter.
Ignoring Fixture and Bracket Load
The pole must be sized for what it carries, not only for how tall it is.
Using Generic Height Rules Without Reviewing the Site
A “standard” height may still be wrong if the road width, spacing, environment, or glare sensitivity is different.
Focusing Too Much on Appearance
A decorative pole that is poorly matched to the lighting need or structural demand creates a weak project outcome.
Underestimating Wind and Foundation Effects
Pole height affects not only the top of the system, but also the loading at the base and the required foundation response.
For related structural reading, see:
Light Pole Foundation Design Basics
Review Basis: What Better Buyers Usually Check
In practical review, better buyers and consultants usually check:
- application fit
- layout and spacing logic
- luminaire and bracket load
- wind exposure
- corrosion environment
- shaft dimensions and wall thickness
- foundation coordination
- compliance with project requirements
This is why the best pole choice is not simply “the tallest” or “the strongest.”
It is the one that fits the site, lighting requirement, structural demand, and budget logic together.
Conclusion
Choosing the correct height and dimensions for a light pole is a key step in achieving lighting that is:
- effective
- safe
- structurally reliable
- visually appropriate
- cost-efficient over time
The best choice depends on more than appearance or catalog height. It should reflect the application, layout, fixture load, wind exposure, material choice, and review requirements of the project.
For roads, parking areas, estates, public spaces, and solar-lighting installations, better results usually come from reviewing height, dimensions, and lighting layout together, not separately.
Need Help Choosing Pole Height and Dimensions?
If you are selecting light poles for a municipal road, parking lot, estate, pathway, or solar lighting project, the next step is usually to review the site layout and luminaire configuration together rather than choose the pole from a simple height chart alone.
Next actions:
- Explore Solutions
- View Product Options
- See Project References
- Request Engineering Support (24H)
- Review Manufacturing & Quality
- See Markets We Serve
FAQ
What is the standard height for a light pole?
There is no single standard height for every project. As a practical guide, pathways may use 3–6 m poles, parking areas often use 6–9 m poles, and many municipal roads use 9–12 m poles.
How do I choose the right pole height for outdoor lighting?
Start with the application, area layout, luminaire type, spacing, wind exposure, and project requirements. The correct height should also be reviewed with pole dimensions and structural load.
Why do pole dimensions matter in addition to height?
Because height alone does not determine structural performance. Diameter, wall thickness, base plate, arm length, and fixture load all affect stability, durability, and safety.
Are taller light poles always better?
No. Taller poles can improve coverage in some applications, but they can also increase glare, wind loading, structural demand, and cost if they are not matched to the site.
What should be checked for coastal or exposed areas?
Projects in coastal or exposed environments should review corrosion resistance, wind load, material choice, protective finish, and long-term maintenance risk more carefully.
