
Quick Answer
High mast lighting does not have one fixed coverage area or one fixed fixture quantity. For early planning, many high mast systems use 4 to 16 LED floodlights per pole, depending on mast height, site size, target lux, beam optics, aiming, pole spacing, and uniformity requirements.
A 20 m mast may fit smaller yards, toll zones, roundabouts, and compact open areas. 25–30 m masts are often used for logistics yards, industrial sites, highway interchanges, and medium-to-large open areas. 35 m+ masts may be considered for ports, container terminals, aprons, and large industrial yards.
However, the final number of poles and floodlights should be verified by DIALux or Relux using the actual IES/LDT photometric files, site layout, target lux, uniformity requirement, and obstruction conditions.
What This Guide Covers
This guide explains how high mast lighting coverage is estimated during early planning, how many LED floodlights may be needed per pole, why mast height alone is not enough, and when EPC contractors, municipal engineers, port planners, logistics yard operators, and industrial project teams should use DIALux or Relux for final layout review.
It also helps buyers compare mast height, floodlight quantity, beam optics, aiming logic, pole spacing, standard pole lighting, project inputs, and required documents before procurement or tender approval.
High Mast Lighting Coverage: Key Project Review Points
Before choosing a high mast lighting layout, buyers should not judge coverage by mast height, wattage, or visible brightness alone. The usable coverage area depends on the full project condition, including fixture quantity, optics, aiming, pole spacing, target lux, uniformity, and site obstructions.
- Main question: how much area the high mast system can cover and how many LED floodlights may be needed per pole
- Best-fit projects: ports, container yards, logistics yards, highway interchanges, aprons, industrial yards, toll zones, and large outdoor parking areas
- Common fixture quantity: many early planning layouts use 4–16 LED floodlights per pole, depending on mast height, site size, target lux, optics, and uniformity requirements
- Common mast height range: 20 m for compact areas, 25–30 m for many yards and interchanges, and 35 m+ for ports, aprons, terminals, and large industrial sites
- Key decision factors: mast height, floodlight quantity, lumen output, beam optics, aiming angle, pole spacing, site obstructions, target lux, and uniformity
- Project inputs needed: site dimensions, application type, target lux, preferred mast height, floodlight quantity preference, DWG/CAD layout, Google pin, and obstruction notes
- Documents for review: IES/LDT files, DIALux or Relux simulation, layout drawing, product datasheet, mast drawing, foundation notes, and BOQ reference
- Common mistake: assuming a taller mast or higher wattage automatically means better usable coverage
Quick Planning Answer: How Many High Mast Lights Do You Need?
For early planning, many high mast lighting systems use 4 to 16 LED floodlights per pole, depending on mast height, site size, target lux, beam optics, aiming angle, and uniformity requirement.
As a rough reference:
| Mast Height | Common Floodlight Quantity per Mast | Typical Application | Early Planning Notes |
|---|---|---|---|
| 20 m | 4–6 floodlights | Toll zones, small yards, roundabouts | Check glare and edge coverage |
| 25 m | 6–8 floodlights | Logistics yards, parking areas, medium industrial sites | Check beam overlap and pole spacing |
| 30 m | 8–12 floodlights | Highway interchanges, larger yards, industrial areas | Check dark zones, aiming, and uniformity |
| 35 m+ | 10–16 floodlights | Ports, terminals, aprons, container yards | Require simulation, structural review, and maintenance planning |
A simple rule of thumb is that high mast pole spacing may start around 2.5 to 3.5 times the mounting height during early planning. However, this should never be treated as final design.
Final mast count and floodlight quantity should be verified by DIALux, Relux, or other photometric software using:
- actual IES/LDT files
- site dimensions
- target lux
- uniformity requirement
- beam optics
- aiming direction
- maintenance factor
- obstruction conditions
- civil and electrical constraints
What Is a High Mast Light?
A high mast light is a tall-area lighting system that uses a high pole, multiple LED floodlights or luminaires, a mounting ring or bracket system, electrical components, and sometimes a lowering system to illuminate large open areas.
Some buyers may also search for this product as “highmast light”, “highmast lighting”, or “high mast floodlight”, but the more common technical term is high mast light or high mast lighting system.
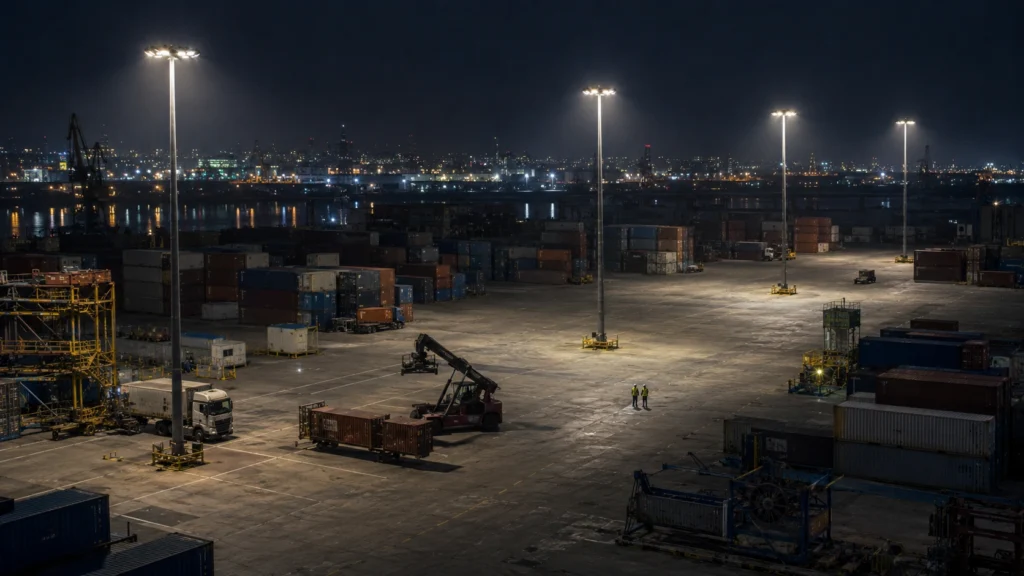
High mast lights are commonly used for:
- ports and container yards
- highway interchanges
- airports and aprons
- logistics yards
- industrial areas
- toll plazas and roundabouts
- large parking areas
- large public or municipal open spaces
Unlike standard street lighting, high mast lighting is not designed only for a narrow road edge. It is usually used when a wide area needs fewer pole positions, stronger beam control, and a project-specific lighting layout.
High Mast Light vs Floodlight: What Is the Difference?
A high mast light is the complete lighting system. It may include the mast pole, mounting ring, LED floodlights or luminaires, lowering system, electrical components, foundation design, anchor bolts, cable routing, grounding, and control cabinet.
A floodlight is only the luminaire or lighting fixture mounted on the mast.
For example, a 30 m high mast lighting system may include:
- one 30 m mast
- 6 to 12 LED floodlights
- mounting ring or bracket system
- electrical cabinet and wiring
- foundation and anchor bolts
- optional lowering system for maintenance
This is why high mast lighting coverage cannot be judged by floodlight wattage alone. The final result depends on mast height, floodlight quantity, beam angle, aiming direction, target lux, uniformity, and site layout.
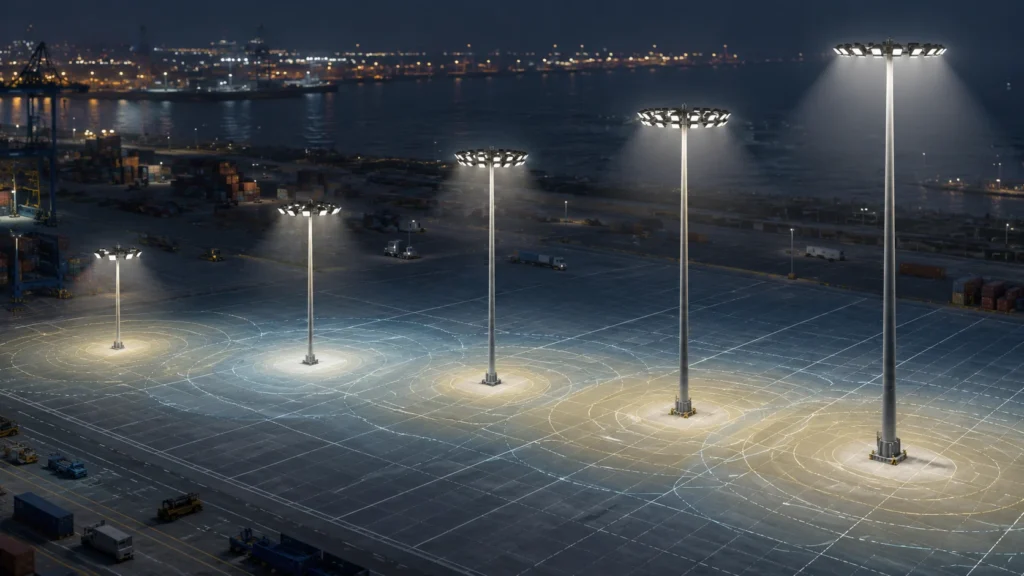
There Is No Single Fixed Coverage Number
There is no single fixed coverage number for all high mast lighting projects.
A mast may throw light over a large area, but the usable coverage is only the area that still meets the project requirement for:
- average lux
- minimum lux
- uniformity
- glare control where required
- spill-light control where required
- maintenance factor over time
That is why two 30 m high mast lighting systems can perform very differently in the field. One may work well in a logistics yard, while another may create dark zones, poor uniformity, glare complaints, or inspection problems if the optics, aiming, floodlight quantity, and spacing are different.
If your site is a container yard, industrial storage zone, road interchange, apron, or port work area, treat rough coverage charts only as early planning guidance. The final answer should come from a photometric simulation.
High Mast Lighting Coverage Chart for Early Planning
The table below is only for early planning. It does not guarantee final project coverage because real results depend on target lux, uniformity, beam optics, floodlight quantity, aiming angle, mast spacing, site obstructions, and maintenance factor.
| Mast Height | Early Planning Coverage Reference | Typical Application | Approx. LED Power per Mast | Review Notes |
|---|---|---|---|---|
| 20 m | 60–80 m diameter | Roundabouts, toll zones, small yards | 400–600 W | Check glare and edge coverage |
| 25 m | 80–100 m diameter | Logistics yards, medium industrial areas | 600–800 W | Check beam overlap and uniformity |
| 30 m | 100–130 m diameter | Highway interchanges, large yards | 800–1,000 W | Check aiming, dark zones, and spacing |
| 35 m+ | 130–160 m+ diameter | Ports, terminals, aprons, large industrial sites | 1,000–1,500 W | Require simulation and structural review |
These values are rough references only. Final layouts should be verified by photometric simulation against actual lux and uniformity targets.
The wattage ranges above are preliminary planning references only. Final floodlight quantity and power should be confirmed by the required lux level, optical distribution, aiming plan, maintenance factor, site conditions, and simulation result.
What Buyers Usually Want to Know Before Quotation
Most buyers asking about high mast lighting coverage are not only asking for a technical definition. They usually want to know:
- whether one mast can cover the required working area
- whether 20 m, 25 m, 30 m, or 35 m+ is more suitable
- how many masts may be needed before final BOQ
- how many LED floodlights should be installed on each mast
- whether fewer taller masts can reduce total project cost
- whether the layout may create dark edges or glare complaints
- whether the proposal can support consultant or authority review
- what documents are needed before approval or procurement
That is why the first answer can be a coverage estimate, but the final answer should be based on site dimensions, target lux, IES/LDT files, DIALux or Relux simulation, and BOQ scope.
What Determines High Mast Lighting Coverage?
In real projects, the effective coverage of a high mast lighting system is controlled by several factors working together.
For buyers, these factors do not only affect lighting performance. They also affect mast quantity, floodlight quantity, BOQ cost, foundation scope, maintenance access, and whether the layout can pass project review.
1. Mounting Height
A taller mast spreads light over a wider area. But as the light travels farther, the ground illuminance drops. More reach does not automatically mean better usable performance.
2. Floodlight Quantity
High mast lighting usually uses multiple LED floodlights or luminaires at the top of the mast. The number of fixtures affects output, overlap, aiming flexibility, and BOQ cost.
A 30 m mast with 4 floodlights will not perform the same as a 30 m mast with 8 or 12 floodlights, even if the mast height is identical.
3. Lumen Output
A higher-output luminaire package can maintain useful lux over a larger area. But wattage alone is not enough if the optical distribution is wrong.
4. Beam Optics
This is often the most decisive factor.
At the same pole height and wattage, different optics can produce completely different results:
- Narrow beam optics for long throw and concentrated intensity
- Medium beam optics for balanced reach and spread
- Wide or asymmetric optics for yards, road junctions, ports, depots, and rectangular layouts
5. Fixture Aiming and Beam Overlap
High mast lighting is not a single-cone system. It is usually a multi-fixture arrangement where useful coverage comes from overlapping beams, not from one isolated light cone.
6. Required Lux and Uniformity
The visible edge of light is not the same as the usable design area.
The real question is not:
How large is the bright circle?
The real question is:
How large is the area where lux and uniformity still meet the project requirement?
How to Select Mast Height Without Overestimating Coverage
Mast height should not be selected only by the desire to cover a larger area. A taller mast can increase reach, but it can also create glare, edge darkness, poor uniformity, or higher civil and maintenance requirements if optics and aiming are not reviewed correctly.
| Pole Height | When It May Fit | What to Check |
|---|---|---|
| 20 m | Smaller open areas and compact yards | Glare control, edge coverage, pole spacing |
| 25 m | Medium yards, parking areas, industrial roads | Beam overlap, uniformity, floodlight quantity |
| 30 m | Highway interchanges, logistics yards, larger open areas | Aiming, glare, dark zones, maintenance access |
| 35 m+ | Ports, aprons, container yards, large industrial sites | Structural design, lowering system, wind load, DIALux verification |
The goal is not to choose the tallest mast. The goal is to choose a mast height that works with the floodlight quantity, optical distribution, aiming plan, maintenance access, and project approval requirements.
Simple Example: Why Area Alone Cannot Decide Mast Quantity
Assume a logistics yard has an open area of about 10,000 m² and the buyer is considering 30 m high mast lighting.
A rough coverage chart may suggest that one 30 m mast can throw light across a large diameter. However, that does not mean one mast can properly illuminate the whole yard.
The final result depends on:
- target lux
- minimum lux
- uniformity
- floodlight quantity
- beam optics
- aiming direction
- mast spacing
- container or equipment obstructions
- maintenance factor
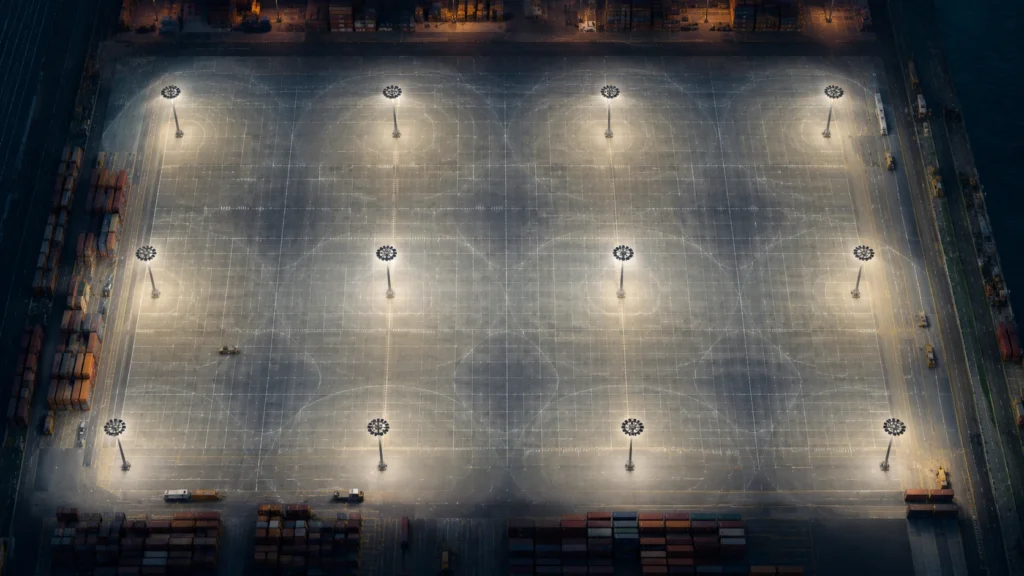
In many real layouts, the problem is not the center brightness under the mast. The problem is the edge area, the transition zone between masts, and dark zones caused by poor overlap or blocked beams.
That is why a rough area estimate can start the discussion, but final mast quantity should be checked through photometric simulation.
A Field Observation: Edge Coverage Usually Fails Before Center Brightness
In early layout reviews for yard, port, and apron projects, the most common buyer mistake is not choosing the wrong mast height first. It is assuming that a layout that looks bright in the middle will also provide usable coverage at the working edge.
In practice, the weak point is usually not the center zone under the mast. It is the outer working area, the transition zone between masts, or the space partially blocked by containers, equipment, structures, or operating traffic paths. That is where layouts that look acceptable on paper often start to fail.
We also often see buyers compare one taller mast against two more balanced mast positions as if height alone should win. In many real layouts, that assumption does not hold. A scheme with better beam overlap, more realistic aiming, and more stable edge coverage can perform better than a “fewer, taller, stronger” concept that only looks efficient in a rough estimate.
This matters most in:
- container yards
- loading zones
- aprons
- highway interchanges
- industrial working areas
- CCTV-sensitive outdoor zones
Three Coverage Mistakes Buyers Often Make
In real high mast projects, buyers often overestimate usable coverage in three ways.
1. Assuming Mast Height Alone Determines Coverage
A taller mast can throw light farther, but that does not automatically create better usable area. In many layouts, beam optics, aiming, and overlap matter more than height alone.
2. Judging Coverage by the Visible Bright Area
A site may look bright from a distance and still fail the actual requirement. The real design question is not how large the bright circle looks, but how much area still meets average lux, minimum lux, and uniformity targets.
3. Comparing Fewer Masts Only by Capex
In some projects, forcing fewer taller masts to cover everything creates more dark edges, more shadowing, and worse uniformity. Adding one more mast at a lower height can sometimes produce a safer and more stable result.
This is why early coverage estimates should be treated as planning guidance, not as final approval logic.
High Mast Lighting vs Standard Pole Lighting
High mast lighting is not always the best solution. Buyers should compare it with standard pole lighting before finalizing the project direction.
| Project Condition | Better Direction | Why |
|---|---|---|
| Large open area with fewer obstructions | High mast lighting | Fewer tall masts can cover wider operational zones |
| Narrow road or fragmented site | Standard pole lighting | More distributed poles may improve uniformity and reduce spill light |
| Port, apron, container yard, or interchange | High mast lighting | Wide-area coverage and fewer pole positions may be useful |
| Small parking lot or compact yard | Standard poles or lower mast | High mast may create unnecessary cost and glare risk |
| Strict glare or nearby buildings | Simulation-first decision | High mast may need tighter optical control |
| Difficult maintenance access | Compare both options | Lower poles may be easier to service |
The best layout is not always the one with the fewest poles. The safer approach is to compare mast height, pole quantity, optics, civil cost, maintenance access, and photometric performance together.
High Mast Lighting Design Calculation: Why Rough Formulas Are Not Enough
A simple lighting calculation may estimate average illuminance by comparing total lumen output with the target area. However, this rough method cannot confirm whether the site will be properly lit.
High mast lighting design also needs to consider:
- light distribution curve
- beam angle and optical type
- aiming direction
- mounting height
- floodlight quantity
- overlap between beams
- uniformity
- glare control
- spill light
- maintenance factor
- obstructions such as containers, buildings, equipment, or parked vehicles
This is why high mast lighting design should not be approved only by a simple lumen-per-square-meter estimate. For ports, yards, highways, aprons, and industrial areas, DIALux or Relux simulation is usually needed to verify the real lighting result.
Rough Planning Workflow Before Final BOQ
Before asking for a final quotation or BOQ, buyers can use the following workflow:
| Step | What to Review | Why It Matters |
|---|---|---|
| 1 | Site size and application | Defines whether the area is a yard, port, road interchange, apron, or parking zone |
| 2 | Target lux and uniformity | Defines the real lighting requirement, not just visible brightness |
| 3 | Initial mast height | Helps compare 20 m, 25 m, 30 m, and 35 m+ options |
| 4 | Initial floodlight quantity | Helps estimate output, cost, and beam overlap |
| 5 | Pole spacing | Helps identify dark zones and over-wide spacing risks |
| 6 | Obstructions | Containers, cranes, buildings, and equipment can block beam paths |
| 7 | DIALux or Relux simulation | Verifies lux, uniformity, aiming, and mast quantity |
| 8 | BOQ mapping | Connects masts, floodlights, brackets, cables, foundation notes, and documents |
This workflow helps buyers avoid approving a layout only because it looks bright in the center or because the first quotation uses fewer poles.
Standards and Acceptance Notes
High mast lighting coverage should not be approved by visual brightness alone. For EPC, municipal, port, airport, highway, and industrial projects, the final layout should be checked against the project’s required lighting level, uniformity target, glare or spill-light limits, maintenance factor, and acceptance method.
Depending on the project location and authority, the final requirement may be defined by local lighting standards, port or airport operator requirements, road authority requirements, industrial safety rules, or consultant specifications.
The supplier’s role is to provide the correct IES/LDT files, simulation support, layout assumptions, and technical documents for review.
When High Mast Lighting Is Not the Right Choice
High mast lighting is not always the best answer.
It may be the wrong route, or at least the wrong first route, when the site has one or more of the following conditions.
1. The Site Is Too Small or Too Fragmented
If the area is relatively compact, narrow, or broken by many structures, standard poles or a more distributed layout may create better usable coverage with less wasted light.
2. Maintenance Access Is Difficult
Very tall systems may require more planning for lowering devices, maintenance access, spare parts, and long-term servicing. If maintenance logistics are weak, the system can become harder to sustain.
3. Glare or Spill-Light Control Is Sensitive
Near roads, buildings, operating equipment, neighboring properties, or CCTV-sensitive environments, a high mast concept may need tighter optical control than a rough estimate suggests.
4. Civil and Structural Costs Are Being Underestimated
A high mast is not just a luminaire decision. It also involves foundation logic, pole structure, access, lowering system options, cable routing, grounding, and installation method. In some projects, the hidden cost is not the floodlight package but the full mast system.
5. The Approval Process Requires Strong Documentation
If the project must pass consultant review, authority approval, or tender scrutiny, rough claims such as “one mast covers everything” are risky. You may need a DIALux report, IES/LDT files, layout drawings, and a clearer engineering pack before the solution can be trusted.
If your project falls into any of these conditions, it is safer to start from a layout review rather than from a per-mast area guess.
The Professional Way: Use DIALux or Relux
For ports, highways, logistics yards, industrial parks, and other large outdoor sites, the professional way to verify coverage is with DIALux or Relux, using the actual IES/LDT files of the luminaires. This is where a rough planning answer stops and an engineering answer starts.
A proper simulation does not just show whether light reaches the ground. It shows whether the layout is likely to hold up when someone checks the real working area, the outer edge, the darker transition zones between masts, and the effect of aiming, obstruction, and spacing on uniformity.
A proper lighting report can verify:
- average lux
- minimum lux
- uniformity
- beam overlap
- dark zones
- overlit zones
- mast height suitability
- floodlight quantity and aiming direction
- pole spacing and layout feasibility
If you can share a DWG, CAD layout, Google pin, or even a hand sketch with dimensions, the design team can usually provide a much more reliable recommendation than any generic chart can.
Do not rely on rough coverage guesses when the project involves ports, yards, highways, aprons, or municipal inspection.
Recommended Pole Heights by Application
| Application | Typical Height Range | Main Design Focus |
|---|---|---|
| [Highway interchanges 25–30 m | Wide junction coverage with controlled driver glare | |
| Toll plazas and roundabouts | 20–25 m | Compact coverage and strong visibility in transition zones |
| Industrial yards | 25–30 m | Safe movement for trucks, forklifts, and site traffic |
| Container terminals | 30–40 m | Longer reach over stacked containers and large work areas |
| Port berths and aprons | 30–45 m | Reduced shadowing near cranes and loading edges |
| Stadium perimeters and large car parks | 25–35 m | Uniformity, visibility, and CCTV support |
In many logistics and industrial projects, 25–30 m is often the most practical range. Taller poles are more common where each mast must serve a very large open area.
Factors That Reduce Real Coverage Area
Even when the mast height looks correct on paper, several site realities can reduce the useful illuminated area.
Wrong Beam Angle
An overly narrow beam can create hotspots. An overly wide beam can waste output or reduce useful lux.
Poor Mast Spacing
If poles are spaced too far apart, the site may show bright zones under each mast and dark zones between them.
Site Obstructions
Containers, large machinery, buildings, and vertical equipment can block part of the beam and reduce effective coverage.
Maintenance Factor
Dust, humidity, dirt buildup, and lumen depreciation all reduce output over time. A design that only works on day one is not a strong design.
Aging Optics and Dirty Lenses
Lens contamination and material aging can noticeably reduce actual performance.
Inadequate Aiming Logic
Even good floodlights can perform badly if the aiming scheme is not coordinated correctly.
This is why high mast lighting should be treated as a full project system, not as a simple pole-height choice.
What Buyers Should Send Before Asking for a Coverage Answer
If you want a faster and more reliable answer, send as much of the following as possible:
- site dimensions
- target lux or operating expectation
- mast height idea
- application type
- DWG / CAD layout
- Google pin or marked screenshot
- obstruction notes
- BOQ or tender reference
- any preference on floodlight quantity or mast count
The more complete the inputs are, the more reliable the recommendation will be.
Required Documents for High Mast Lighting Review
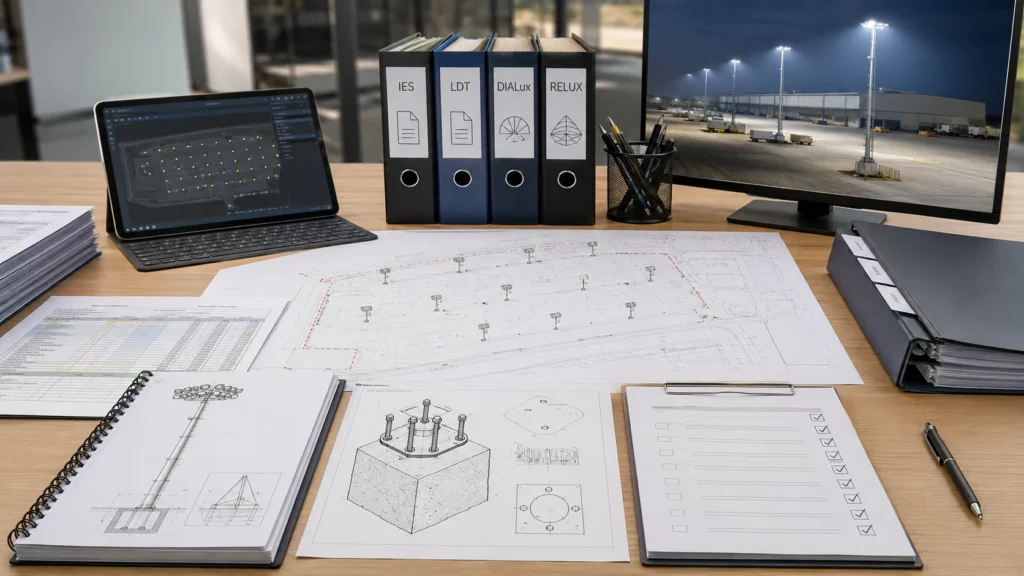
For tender, port, highway, industrial yard, and authority-reviewed projects, buyers should request more than a product datasheet. A reliable high mast lighting review usually needs both photometric and project documents.
| Document / Input | Why It Matters | When Buyers Need It |
|---|---|---|
| Site dimensions or DWG/CAD layout | Defines the real area to be lit | Before layout review |
| Application type | Ports, yards, highways, aprons, and parking zones have different requirements | Before mast height selection |
| Target lux and uniformity | Defines the actual performance requirement | Before simulation |
| IES or LDT photometric files | Supports DIALux or Relux simulation | Before approval or tender review |
| Proposed mast height | Helps compare 20 m, 25 m, 30 m, or 35 m+ options | Early planning |
| Floodlight quantity and wattage direction | Affects output, beam overlap, and BOQ cost | Before quotation |
| Mast drawing and lowering system reference | Supports civil and maintenance review | Before technical submittal |
| Foundation and wind-load notes | Connects lighting layout with structural safety | Before installation planning |
| Electrical layout or cable route | Supports grounding, cable routing, and cabinet planning | Before project coordination |
| DIALux or Relux report | Verifies lux, uniformity, dark zones, and aiming | Before final approval |
| BOQ mapping | Connects mast, floodlights, accessories, and documents | Before procurement |
These documents help the buyer move from a rough coverage guess to a reviewable project direction.
How to Avoid Costly High Mast Lighting Mistakes Before Ordering
Wrong Optics Can Waste Wattage and Still Leave Dark Zones
Choose beam distributions that match the working area instead of forcing one beam type into every project. A high-wattage floodlight with the wrong optics may still fail at the edge of the working area.
Without Simulation, Buyers May Approve the Wrong Mast Count
Do not rely on generic product claims alone. Use IES files and real site dimensions before confirming mast quantity, floodlight quantity, or pole spacing.
Fewer Taller Masts May Increase Glare, Foundation Cost, or Edge Failure
Sometimes an extra mast at a lower height is safer and more efficient than forcing fewer very tall masts to cover everything.
Poor Uniformity Can Create Safety and Acceptance Problems
A lower average lux with better uniformity can often feel safer and more usable than a higher average lux with poor consistency.
Poor Maintenance Access Can Become a Long-Term Problem
Cleaning, inspection, access, and long-term lumen maintenance matter, especially in dusty, humid, port-side, or industrial environments.
Civil and Electrical Coordination Affects Final Success
Foundation design, grounding, cable routing, lowering systems, maintenance access, and installation method all affect the success of the final lighting system.
Related Resources
Product Direction
Engineering Support
- High-Mast Lighting System Design and Simulation
- IES Photometric Files
- DIALux Simulation Outputs
- Tender Documents & BOQ
Project and Civil Review
Related Calculation Guide
FAQ
How much area can a 30 m high mast light cover?
A 30 m high mast can cover a large outdoor area, but the usable coverage depends on floodlight quantity, lumen package, optics, aiming, spacing, obstruction conditions, and the required lux and uniformity target. In practice, the useful area is the part of the site that still meets the lighting requirement, not the widest visible light spread.
How many LED floodlights are usually installed on one high mast pole?
Many high mast lighting systems use 4 to 16 LED floodlights per pole during early planning. Smaller 20 m masts may use 4–6 floodlights, while 30 m or 35 m+ systems may use 8–16 floodlights depending on site size, target lux, optics, and uniformity requirements.
How far apart should high mast poles be spaced?
For early planning, high mast pole spacing may start around 2.5 to 3.5 times the mounting height, but this is only a rough reference. Final spacing should be checked by photometric simulation because target lux, beam optics, obstructions, glare control, and uniformity can change the result.
Is “highmast light” the same as “high mast light”?
Yes. “Highmast light” is a common search variation, but the standard technical term is usually “high mast light” or “high mast lighting system.” It refers to a tall lighting pole system used to illuminate large open areas such as ports, logistics yards, highway interchanges, aprons, industrial yards, and large parking areas.
What is the difference between a high mast light and a floodlight?
A high mast light is the full lighting system, including the mast pole, fixtures, mounting structure, electrical components, and sometimes a lowering system. A floodlight is only the luminaire mounted on the mast. Coverage depends on the complete system, not only the floodlight wattage.
Does a taller mast always mean better coverage?
No. A taller mast usually spreads light over a wider area, but the ground illuminance drops as the distance increases. Without the right optics, floodlight quantity, and aiming logic, a taller mast can create wider but dimmer coverage, poor uniformity, edge darkness, or glare.
Do I need DIALux or Relux for high mast lighting design?
For rough planning, simple tables and quick calculations can help. But for ports, highways, industrial yards, municipal projects, and authority-reviewed work, DIALux or Relux is strongly recommended to verify lux, uniformity, and overall layout performance before procurement and installation.
How many high mast lights do I need for a large yard or port area?
That depends on the site dimensions, target lux, mast height, beam optics, obstruction conditions, and layout goals. In most cases, the fastest way to get a reliable answer is to run a photometric simulation using the actual site layout rather than relying on a fixed per-mast area estimate.
When should buyers choose high mast lighting instead of standard street light poles?
High mast lighting is usually the better choice when the site is very large, open, and operationally complex, such as ports, container yards, highway interchanges, industrial storage areas, and large public parking zones. The main advantage is that fewer tall masts can cover a wider working area, but the system only performs well if height, optics, and layout are engineered together.
What information should I send to get a high mast lighting layout review?
You should send the site dimensions, application type, target lux or tender requirement, preferred mast height, DWG or CAD layout, Google pin, obstruction notes, BOQ reference, and any preference on mast count or floodlight quantity. These inputs help the supplier move from a rough coverage guess to a reviewable layout direction.
Request a High Mast Lighting Layout Review
If you are not sure whether 20 m, 25 m, 30 m, or 35 m+ is suitable for your site, Sunlurio can help review the mast height, floodlight quantity, optics, aiming logic, pole spacing, and DIALux simulation direction.
Please send:
- site dimensions
- application type
- target lux or tender requirement
- preferred mast height
- DWG / CAD layout / sketch
- Google pin
- obstruction notes
- BOQ or tender reference
- preferred mast count or floodlight quantity, if any
