
High mast lighting is typically used for large-area illumination where conventional poles become inefficient or create too many foundations—such as interchanges, ports, logistics yards, large parking areas, airports (zone-specific), and perimeter zones.
This guide is written for EPC & government projects. It focuses on what actually prevents redesign and acceptance disputes:
- layout first (tower locations) → then optics → then aiming
- glare/spill control (not just “more lux”)
- matching IES photometric files (no generic IES)
- DIALux verification + an acceptance-ready deliverables pack
Need an approval-ready deliverables pack?
Send drawings or a Google Map pin → we provide DIALux report + matching IES files + BOQ-ready configuration within 24 hours.
✅ Request Lighting Design (DIALux/IES)
Quick Answer (30s)
Use high mast lighting when: the area is wide/open (yards, interchanges, ports, large parking) and conventional poles would require too many foundations or still fail uniformity.
Design order (EPC-safe):
Layout (tower locations) → Optics/beam choice → Aiming table → DIALux verification (matching IES) → Acceptance pack
What acceptance teams usually check:
Average & minimum illuminance, uniformity, glare complaints, boundary spill (if nearby residential/sensitive zones), and whether the DIALux/IES evidence matches the installed aiming.
Minimum deliverables to avoid redesign:
Luminaire list + matching IES files + DIALux report (PDF) + aiming table (tilt/rotation) + RFQ checklist.
Table of Contents
- 1) When should you use high mast lighting?
- 2) High mast basics (height, luminaire count, maintenance)
- 3) Step-by-step high mast lighting design workflow (EPC-ready)
- 4) Layout patterns: where to place towers (and why)
- 5) Glare control: the mistake that causes complaints & rejection
- 6) Photometrics: how to choose optics & verify with IES files
- 7) DIALux verification: what to check before installation
- 8) High Mast vs High Pole vs Flood Light: what’s the difference?
- 9) Quick starting “calculator”: how many towers do you need?
- 10) RFQ / Tender checklist (copy-paste)
- 11) Common mistakes that cause redesign (and how to avoid them)
- FAQ
- Next step
- Related Pages
1) When should you use high mast lighting?
Use high mast lighting when the project area is wide, open, or geometrically complex, and conventional street-light poles would cause:
- too many poles/foundations (high civil cost, slow installation)
- poor uniformity over large footprints
- too many obstructions (traffic safety, clearance, operations)
- difficult maintenance logistics if poles are distributed everywhere
Typical scenarios:
- highway interchanges, toll plazas, large junction zones
- ports, container yards, logistics/industrial yards
- large parking areas and plazas
- large perimeter and security boundary zones
- sports surroundings / training fields (when towers are acceptable and spill is controlled)
EPC rule of thumb:
If a conventional layout creates too many foundations or still cannot deliver uniformity without glare, move to high mast and design it as a system (layout + optics + aiming + verification), not as a “bigger wattage” shortcut.
2) High mast basics (height, luminaire count, maintenance)
Typical system characteristics
High mast lighting usually includes:
- a tall tower/pole (commonly 20–35 m range depending on site)
- multiple luminaires per tower
- defined aiming/rotation per luminaire (aiming table)
- maintenance method planning (fixed headframe or lowering system)
Maintenance planning matters
High mast systems often require:
- clear maintenance procedures and safe access
- spare parts strategy (drivers, surge protection, optics parts)
- commissioning notes (aiming lock, angle limits, inspection record)
Project tip: Maintenance is part of acceptance. If a project is government/EPC, define how the system will be maintained at RFQ stage (not after installation).
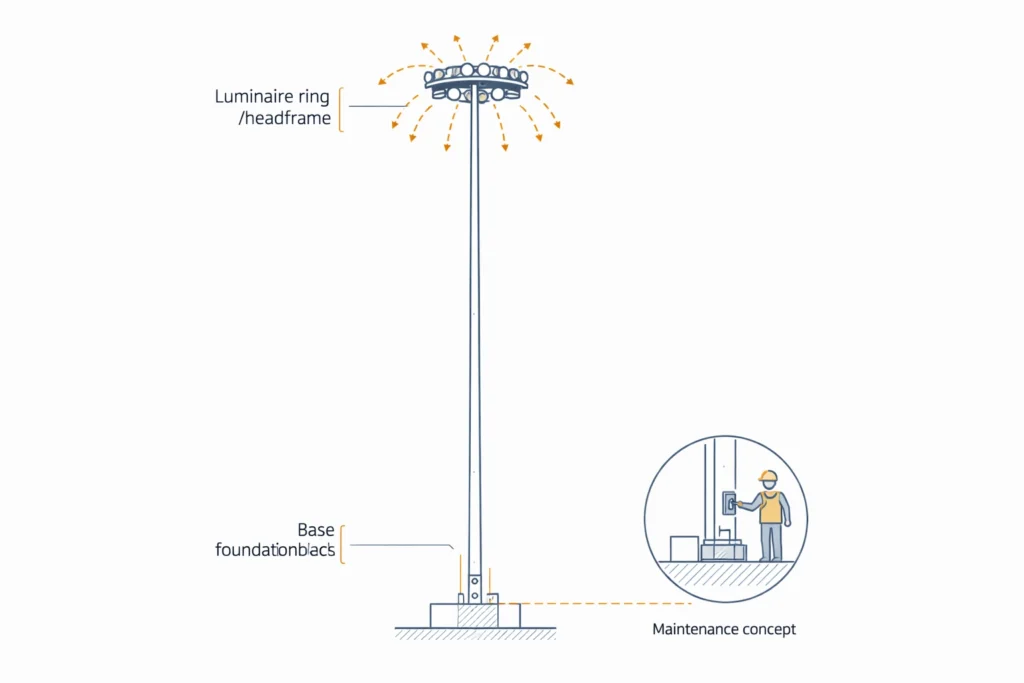
High mast lighting system diagram (tower, luminaires, aiming directions)
Minimum inputs we need (to avoid redesign)
| Item | Example |
|---|---|
| Site boundary / dimensions | CAD plan or Google Map polygon + key lengths |
| Target criteria | Avg lux + min lux + uniformity target |
| Constraints | No-pole zones, clearance, boundary spill limits |
| Power & routing | Power points, cable routes (if applicable) |
| Maintenance preference | Fixed headframe or lowering system (if specified) |
3) Step-by-step high mast lighting design workflow (EPC-ready)
High mast projects fail when teams “jump to wattage.” Use this order:
Step 1 — Confirm what acceptance will check
- target illuminance (average + minimum)
- uniformity (min/avg or min/max per tender)
- boundary spill control (if residential or sensitive edges exist)
- glare/obtrusive light requirements (if specified)
- referenced standard (tender/local)
Step 2 — Collect site inputs (minimum required)
- CAD/site plan with dimensions (or a Google Map boundary + key dimensions)
- obstructions, “no-pole zones,” road clearances, safety constraints
- power points and cable route constraints
- wind/corrosion environment (for tower protection strategy)
- maintenance preference (fixed vs lowering system)
Step 3 — Choose a starting tower height (then verify)
Start with a practical height range (final choice comes from simulation):
- medium sites: 20–25 m
- large yards / interchanges: 25–35 m
- special cases: 35 m+ only if justified by layout + glare control
Step 4 — Layout first: place towers before choosing optics
Tower locations control:
- uniformity (large-scale)
- aiming angles (glare risk)
- boundary spill (edge control)
- civil scope (foundations and cable paths)
Step 5 — Select luminaire type + optics (distribution)
Choose optics to solve the layout—not the other way around:
- symmetric patterns for central-area coverage (site dependent)
- asymmetric patterns to shape boundaries and control spill
- add glare control accessories if required (louvers/visors where applicable)
Step 6 — Lock aiming strategy (aiming table)
For each luminaire on the tower:
- tilt angle
- rotation angle
- aiming direction reference (e.g., toward zone centerline or target grid)
Step 7 — Verify in DIALux using matching IES files
DIALux verification should confirm:
- average + minimum + uniformity
- boundary spill control (if required)
- aiming table consistency and installation feasibility
- revision control (if aiming changes on site → update report)
Recommended high mast luminaire (project-ready):
If you already know your site type (interchange / yard / parking / port), you can start from a proven high mast luminaire model and then validate layout + aiming in DIALux using the matching IES files.
✅ High Mast Light (Product)
✅ If you want an approval-ready deliverables pack format (IES list + DIALux PDF + aiming table + BOQ-ready configuration):
✅ Request Lighting Design (DIALux/IES)
✅ If you want an approval-ready pack (matching IES + DIALux PDF + aiming table + BOQ-ready configuration), request it early to avoid redesign during approval.
✅ Request Lighting Design (DIALux/IES)
4) Layout patterns: where to place towers (and why)
High mast design quality is mostly determined by tower placement. Aiming cannot “fix” a bad layout without creating glare or spill.
Common patterns (practical)
1) Perimeter + corners
- Best boundary spill control
- Strong for yards near sensitive boundaries
- Often requires more towers for strong uniformity
2) Grid / matrix
- Best uniformity for wide open areas
- Requires careful aiming to prevent boundary spill
- Good for large logistics yards and open parking areas
3) Interchange-focused
- Place towers around merge/gore areas and critical conflict zones
- Reduce severe aiming and avoid “hot spots” at ramp transitions
- Must coordinate with civil safety constraints and clearances
Design rule:
Layout solves uniformity at a macro level. Optics + aiming refine it—do not reverse the order.
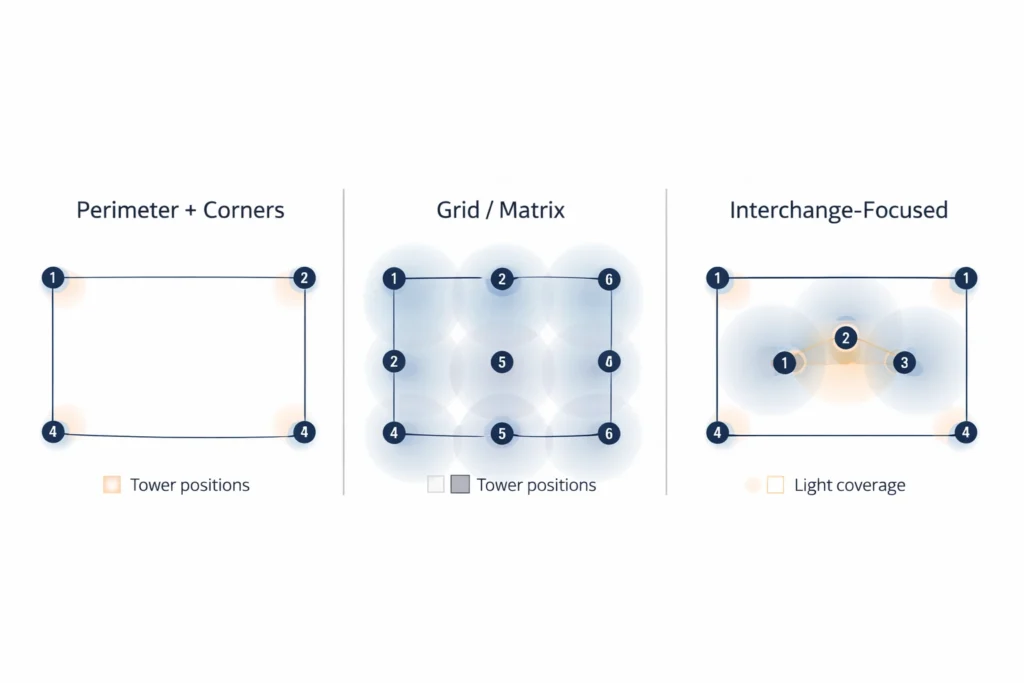
High mast lighting layout patterns: perimeter, grid, interchange-focused tower placement
5) Glare control: the mistake that causes complaints & rejection
Many proposals pass “average lux,” but fail in real life due to glare:
- drivers complain about discomfort and reduced visibility
- neighbors complain about spill and trespass
- acceptance teams reject due to mismatch vs the verification pack
Common failure mode
- too few luminaires
- too high intensity per luminaire
- aggressive aiming to patch dark zones
Practical glare-control approach
- improve uniformity with layout + optics, not by increasing tilt
- use optics that limit high-angle output where needed
- keep aiming conservative and documented
- verify in DIALux and keep the report in the acceptance pack
EPC tip:
If the installer changes aiming on site, it must be recorded and re-verified—or your acceptance evidence becomes invalid.
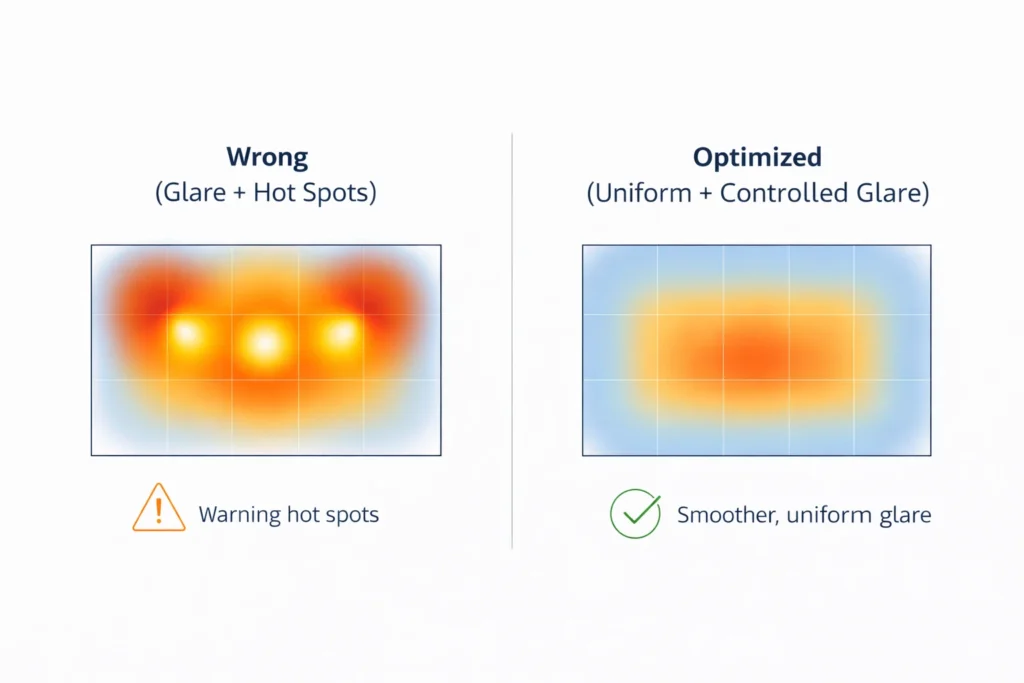
High mast lighting glare control comparison: wrong aiming vs optimized uniform layout
6) Photometrics: how to choose optics & verify with IES files
Optics selection (what matters)
For high mast, the optic choice determines:
- uniformity across large distance
- spill outside the boundary
- glare risk at driver/spectator lines
- whether you need more towers or fewer
EPC note: IES must match the offered model (non-negotiable)
Simulation is only as good as the IES photometric file. Require the exact IES for:
- the offered luminaire model
- the offered optic/lens configuration
- the offered mounting condition (if variations exist)
EPC note (linkable reference): Always confirm the IES photometric file matches the exact luminaire model you will install.
For reference, here is our project-ready luminaire page (model options and configuration start point):
✅ High Mast Light (Product)
7) DIALux verification: what to check before installation

Workflow to verify high mast lighting using IES photometric files and DIALux report
Minimum checks (acceptance-safe):
- average + minimum level and uniformity (per tender)
- calculation grid + boundary definition
- tower locations + mounting heights
- luminaire list + matching IES files
- aiming table (tilt/rotation per luminaire)
- boundary spill check (if required)
- revision control log (if aiming or layout changes)
✅ Request Lighting Design (DIALux/IES)
8) High Mast vs High Pole vs Flood Light: what’s the difference?
These terms are often mixed in tenders. Use this section to avoid wrong scope, wrong pricing, and acceptance disputes.
| Term | Typical meaning | Typical use cases | Key risk if mixed up |
|---|---|---|---|
| High Mast Lighting | Multi-luminaire system on a tall tower | Interchanges, yards, ports, large parking, perimeter areas | Wrong tower quantity/aiming plan → glare + non-uniformity |
| High Pole Lighting | Tall pole with fewer luminaires | Parking, plazas, medium-wide areas | Maintenance cost rises if access is difficult |
| Flood Lighting | Floodlights aimed to cover a target zone | Sports, facades, boundaries, special zones | Spill light + glare complaints if aiming is not controlled |
Practical EPC note:
- If aiming angles are critical (sports/yard boundary), treat it like flood lighting: aiming table + spill boundary must be part of acceptance evidence.
9) Quick starting “calculator”: how many towers do you need?
This is not the final design, but it helps you start an RFQ and avoid unrealistic proposals.
Step A — Define the area and targets
1) area size (m × m) or polygon boundary
2) target average illuminance (lux)
3) target uniformity ratio (per tender)
4) site constraints: no-pole zones, boundary spill limits
Step B — Choose a starting tower height (then verify)
- medium area: 20–25 m
- large yard / interchange: 25–35 m
- special: 35 m+ only if justified by layout + glare control
Step C — Pick one layout pattern to start
- Perimeter + corners for spill control
- Grid for uniformity
- Interchange-focused for complex geometry
Step D — Verify (acceptance-safe)
The final answer must come from:
- tower height + quantity + locations
- luminaire list + matching IES files
- aiming table
- DIALux report PDF
✅ Request Lighting Design (DIALux/IES)
✅ Explore project-ready solutions
Start from a proven high mast luminaire configuration and then fine-tune layout and aiming in DIALux using the matching IES file.
✅ High Mast Light (Product)
10) RFQ / Tender checklist (copy-paste)
Copy into your tender/RFQ:
- Target illuminance & uniformity requirements (and referenced standard)
- Area drawing / site geometry / boundary constraints
- Tower height + quantity + location plan
- Luminaire model list (exact model) + matching IES photometric files
(Reference model page: ✅ High Mast Light (Product)) - DIALux/Relux report (PDF) based on the matching IES files
- Aiming table (tilt/rotation per luminaire) + commissioning notes
- Boundary spill check (if residential/sensitive boundary exists)
- Warranty + spare parts plan + surge protection requirement
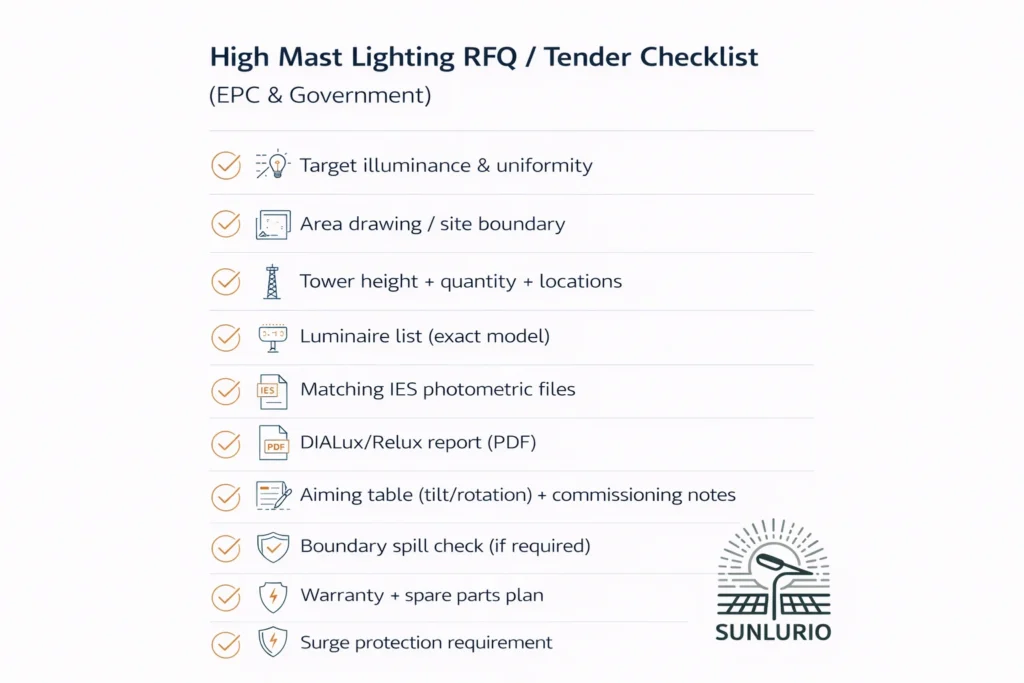
High mast lighting RFQ tender checklist for EPC and government projects
✅ Request the Engineering Support deliverables pack
11) Common mistakes that cause redesign (and how to avoid them)
Mistake 1 — Using generic IES files
Fix: require IES for the exact offered model + optic configuration.
Mistake 2 — “Average lux is ok” but uniformity fails
Fix: layout first, then optics, then aiming. Use DIALux uniformity results as acceptance evidence.
Mistake 3 — On-site aiming changes without revision control
Fix: lock aiming table and keep a “site change log” + updated DIALux PDF.
Mistake 4 — Ignoring boundary spill until complaints happen
Fix: define spill boundary early and verify it in DIALux.
FAQ
How do I choose high mast height?
Start with a practical height range based on area size, then verify with IES + DIALux. The “right height” is the one that meets:
- target average + minimum lux
- uniformity
- boundary spill constraints (if any)
- glare control requirements
- practical installation and maintenance limits
How many luminaires per tower?
It depends on:
- target lux and uniformity
- optics / beam angles
- tower height and spacing
- spill/glare constraints
That’s why the DIALux report must use the matching IES files and include an aiming table.
What is the best layout pattern for a yard?
- Grid gives strong uniformity for open areas
- Perimeter + corners gives better boundary spill control
Final layout must be validated in DIALux.
Can I reduce tower quantity by using higher wattage fixtures?
Sometimes the average lux can be met, but the usual trade-off is:
- worse glare
- worse uniformity
- more spill light
EPC acceptance is rarely only “average lux.”
What documents should I request for approval?
At minimum:
- matching IES files
- DIALux report PDF
- aiming table
- BOQ-ready configuration / model list
✅ Request Lighting Design (DIALux/IES)
Next step
Send your drawings or a Google Map link → get DIALux + IES + BOQ-ready configuration within 24 hours.
✅ Request Lighting Design (DIALux/IES)
✅ Explore Solutions
Related Pages
- Solutions — Project-ready configurations for different road and area scenarios
- High Mast Light (Product) — Luminaire options to start configuration + matching photometrics
- Engineering Support — DIALux/IES deliverables, BOQ-ready configuration, acceptance documents
- Contact — Share drawings / Google Map link and get support.
