
Light pole installation looks simple until a small error starts costing time, crane money, and rework on site.
In many road, estate, industrial, and public-lighting projects, the main installation problems are not the poles themselves. They are usually:
- misaligned anchor bolts
- wrong pole schedule or bracket orientation
- concrete released too early
- poor grounding
- damaged coating at erection
- incomplete handover checks
For EPC contractors, subcontractors, and site teams, proper installation is not only about getting the pole upright. It is about delivering a lighting system that is straight, safe, electrically complete, auditable, and easier to hand over without argument.
Quick Answer
A proper light pole installation should confirm six things before handover:
- the pole type, height, and bracket arrangement match the approved drawings
- the foundation and anchor bolts match the base plate exactly
- the pole is plumb, aligned, and tightened correctly
- the electrical work and grounding are complete and safe
- the coating and mechanical parts have not been damaged during erection
- the installation passes inspection, testing, photos, and handover review
In practical terms, most delays and failed inspections come from:
- poor pre-installation planning
- missing or wrong bolt-template control
- rushed concrete release
- grounding skipped or left unclear
- handover checks left until the last minute
Need help checking pole schedules, anchor bolt templates, base-plate drawings, or installation details before site work starts?
Explore Solutions
Request Engineering Support (24H)
Why Proper Light Pole Installation Matters
A light pole is not only a steel shaft with a luminaire on top. In real projects, it becomes part of a wider system involving:
- civil works
- structural stability
- cable routing
- grounding
- traffic or site safety
- future maintenance access
- final acceptance and handover
That is why installation quality affects more than appearance.
A badly installed pole can lead to:
- inspection rejection
- leaning poles
- cracked foundations
- loose base plates
- electrical faults
- corrosion starting earlier than expected
- disputes at handover
For contractors, this matters because installation quality affects:
- labor productivity
- crane time
- safety exposure
- change orders
- rectification cost
- project reputation
Who This Guide Is For
This guide is written for teams that actually need to deliver site work properly, especially:
- EPC contractors
- site engineers
- subcontractors
- municipal project teams
- industrial-facility contractors
- newer installers moving into formal public or B2B jobs
It is not meant to replace structural drawings or electrical code. It is meant to reduce the most common site and handover mistakes that delay projects.
Light Pole Basics Before Installation
Before any installation starts, the site team should understand what kind of pole is being installed and what it is expected to carry.
Where Light Poles Are Commonly Used
Light poles are commonly used in:
- public roads and highways
- residential streets and estates
- parking lots and commercial plazas
- sports fields, parks, and campuses
- ports, industrial yards, and factories
In many projects, the pole may also carry:
- CCTV
- signage
- small antennas
- solar fixtures
That additional equipment changes both load and wind demand.
Common Types of Light Poles
| Pole Type | Typical Applications | Key Advantages | Main Limitations |
|---|---|---|---|
| Steel | Roads, highways, industrial yards | Strong, cost-effective, many sizes | Needs proper corrosion protection |
| Aluminum | Coastal roads, waterfronts | Corrosion-resistant, lightweight | Higher material cost |
| Fiberglass | Parks, decorative areas, near substations | Non-conductive, lightweight | Lower structural capacity |
| Concrete | Industrial and high-vandalism areas | Robust, long service life | Heavy and slower to install |
| Wood | Rural or temporary works | Cheap and available locally | Shorter service life |
For many B2B road and industrial projects, hot-dip galvanized steel poles remain the most practical choice because they balance strength, cost, and availability well.
Key Pole Components
| Component | What It Does |
|---|---|
| Base plate | Sits on the foundation and transfers load |
| Anchor bolts | Secure the pole to the concrete foundation |
| Pole shaft | Main vertical structural member |
| Arm / bracket | Supports the luminaire away from the pole |
| Luminaire | The lighting fixture itself |
| Handhole | Access point for cable connection and maintenance |
Before Mobilization: What Should Be Checked First
A crew should not arrive on site and start excavation without a basic technical review.
Before mobilization, check:
- approved drawings
- pole schedule
- foundation schedule
- anchor bolt template details
- access for crane or boom lift
- underground utility information
- electrical route and conduit plan
- traffic and safety method
This stage prevents many avoidable delays.
Before Order or Fabrication Approval
This is the step many teams skip, and it often creates site problems later.
Before the supplier starts fabrication or before the order is released, confirm:
- pole height and bracket type match the approved lighting layout
- base plate size matches the structural drawing
- bolt circle and hole size match the anchor bolt template
- handhole location and orientation are correct
- bracket outreach and arm direction are correct
- coating / galvanizing requirement is clear
- luminaire mounting interface matches the selected fixture
- accessories, nuts, washers, and templates are included in the scope
For more formal projects, it is better to lock these items through:
- approved pole drawing
- approved base plate drawing
- anchor bolt template drawing
- finish / coating confirmation
- delivery marking list
- packing list
A large share of installation trouble starts before site work, not during erection.
Before Pole Delivery: What Should Be Confirmed With the Supplier
Before poles are delivered to site, confirm:
- pole height and bracket type match the approved schedule
- base plate dimensions and bolt circle match the anchor bolt template
- handhole position is correct
- arm orientation is correct
- coating type and finish are as specified
- packing protection is adequate to prevent coating damage
- accessories, nuts, washers, and templates are complete
- luminaire mounting interface matches the fixture plan
For larger or more formal projects, also request:
- pole drawing
- base plate drawing
- anchor bolt template drawing
- packing list
- coating / galvanizing confirmation
- delivery marking or identification list
A surprising amount of site rework starts because the delivered pole does not match the foundation template or bracket direction.
Pre-Installation Planning for Light Pole Projects
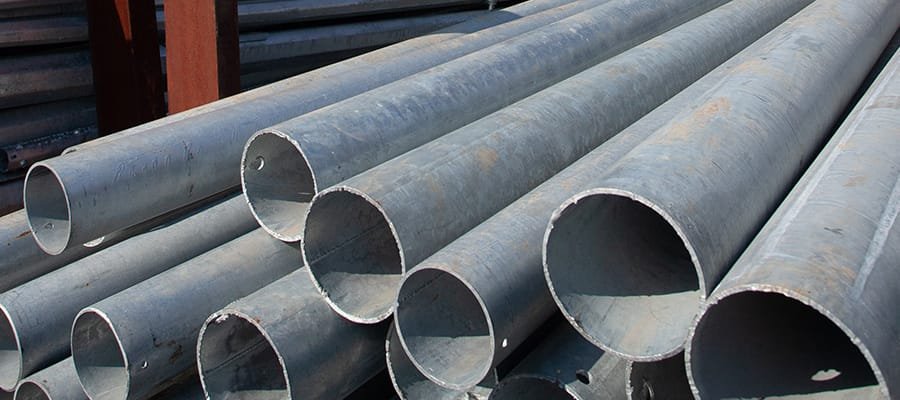
ALT: pre installation planning for galvanized light pole project
Caption: Good pole installation starts with site review, correct drawings, and early coordination of civil, structural, and electrical work.
Site Assessment Before Light Pole Installation
Check the site conditions before foundation work begins.
| Item | What to Check |
|---|---|
| Soil conditions | Soft, sandy, rocky, clay, or backfilled ground |
| Underground utilities | Power, water, fiber, gas, and any marked services |
| Wind exposure | Open/coastal vs sheltered site |
| Traffic and access | Crane access, closures, barriers, and safe working zone |
This is especially important in road and industrial projects where unexpected underground services or weak soil can stop work immediately.
Permits and Standards to Confirm
Depending on the country and client, the project may need to confirm:
- height and setback limits
- traffic safety rules
- electrical code requirements
- structural requirements for poles and foundations
- consultant or municipal approval conditions
A common contractor mistake is ordering poles before confirming whether the approved drawing and the local approval condition actually match.
Choosing the Right Pole for the Project
Do not select the pole only by price.
The correct review should consider:
| Factor | Why It Matters | What to Confirm |
|---|---|---|
| Pole height | Affects lighting coverage and foundation size | Road, yard, path, or parking use |
| Load rating | Must support luminaires, arms, cameras, or signs | Actual fixture and bracket schedule |
| Coating / finish | Affects corrosion life | Inland, coastal, or polluted environment |
| Mounting type | Affects replacement and civil design | Anchor base vs direct burial |
For busy roads, logistics yards, and industrial estates, hot-dip galvanized anchor-base poles are often preferred because they are strong, durable, and easier to replace after impact or damage.
Tools and Equipment Required for Light Pole Installation
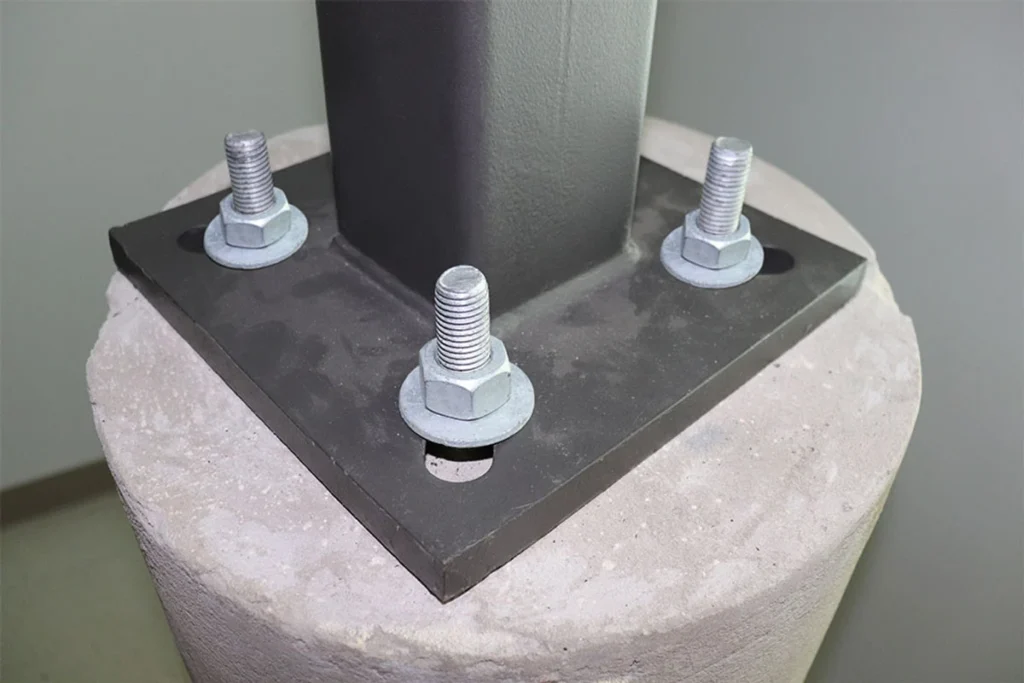
ALT: tools and anchor base equipment for light pole installation
Caption: Missing one key item can delay the whole erection process, especially when crane time is limited.
Installation Tools Checklist
| Tool / Equipment | Purpose |
|---|---|
| Excavator or auger | Digging foundation holes |
| Crane or boom lift | Lifting and positioning poles |
| Spirit level | Checking vertical alignment |
| Plumb line | Verifying straightness |
| Torque wrench | Tightening nuts correctly |
| Hand tools | Spanners, sockets, screwdrivers, pliers |
| PPE | Helmets, gloves, boots, harnesses, vests |
| Laser level (optional) | Checking levels and elevations |
Materials Checklist
| Material | Function |
|---|---|
| Anchor bolt kit | Secures pole to concrete foundation |
| Bolt template plate | Keeps bolts positioned accurately |
| Concrete and rebar | Forms structural foundation |
| Conduit and pull wire | Protects and guides cables |
| Ground rod and clamp | Provides safe earth path |
| Junction boxes | Protects electrical connections |
| Sealants and tape | Helps keep moisture out |
A practical site tip: wrap anchor-bolt threads before concrete work so the nuts can be installed cleanly later.
Step-by-Step Light Pole Installation Guide
A proper installation sequence reduces rework and inspection problems.
Step 1: Foundation Preparation
- mark the exact location
- excavate to the approved size and depth
- install rebar cage as shown on drawing
- place the anchor bolt template
- align bolt spacing, level, and projection
- pour and compact concrete
- allow concrete to cure before loading
In soft or variable soils, never guess the footing size. Follow the approved structural design.
Step 2: Pre-Pour Release — The Most Important Checks
Before pouring concrete, confirm:
- bolt circle matches the base plate
- bolt projection matches the drawing
- anchor bolts are vertical
- template is fixed firmly
- conduit positions are correct
- foundation centerline matches layout
- rebar cover is maintained
This is where many later problems begin. If bolt position is wrong at this stage, the pole may never sit correctly.
Step 3: Pole Lifting and Alignment
- attach lifting slings at correct lifting points
- raise the pole using crane or boom lift
- lower it carefully onto anchor bolts
- install washers and nuts gradually
- check plumb on at least two faces
- adjust with leveling nuts or approved shims
- tighten in a cross pattern to required torque
A leaning pole is not only a cosmetic issue. It can affect:
- glare
- visual quality
- perceived workmanship
- long-term loading behavior
Step 4: Wiring and Grounding
- pull cables through conduits
- connect luminaire circuits according to drawing
- bond and ground the pole properly
- secure all joints and terminals
- seal handholes and junction points
- label circuits where required
Grounding is one of the most commonly missed items in failed inspections. Take extra care here.
Step 5: Final Inspection and Testing
Before handover, confirm:
- pole is plumb
- nuts and washers are seated correctly
- no visible gap at base plate
- circuits operate correctly
- grounding is complete
- handhole is sealed
- photos and test records are taken
A simple inspection record helps reduce disputes later.
Safety Tips for EPC and Site Teams
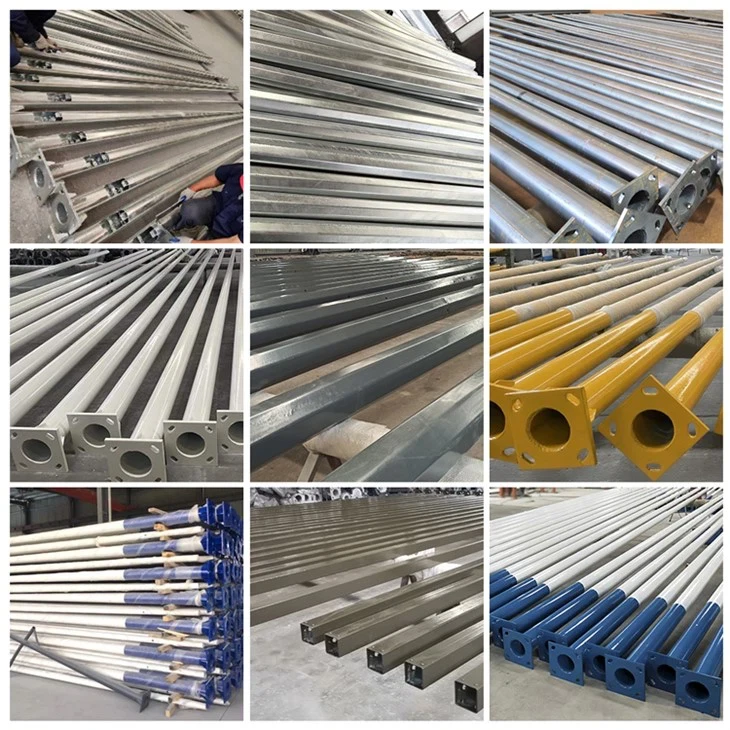
ALT: light pole installation safety and handling in workshop or staging area
Caption: Pole installation safety depends on lifting control, exclusion zones, grounding discipline, and proper traffic management.
Safety should be treated as part of the work method, not an extra task.
Basic Safety Practices
- use PPE consistently
- control the lifting zone
- keep non-essential workers clear of the crane path
- use fall protection where required
- isolate circuits before electrical work
- keep first aid and extinguishers nearby
- use barriers and warning signs in traffic areas
Common Hazards and Prevention
| Hazard | Prevention Tip |
|---|---|
| Pole tipping | Use correct rigging and controlled lifting |
| Bolt misalignment | Fix accurate templates before pour |
| Electrical shock | Test circuits and complete proper grounding |
| Trip hazards | Mark trenches and exposed conduits |
| Falling objects | Exclude non-essential people from lifting area |
Common Mistakes to Avoid
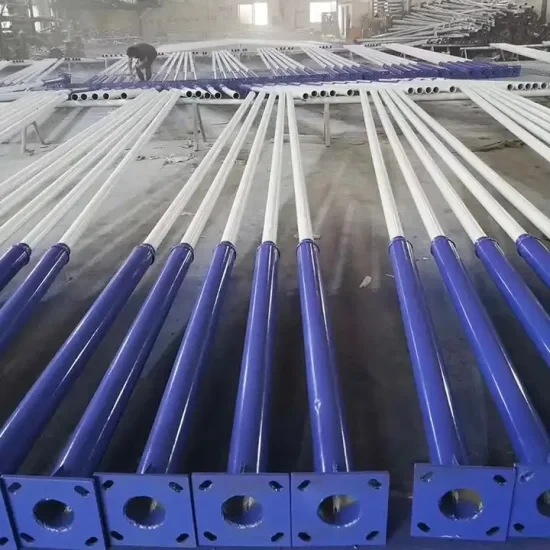
ALT: light pole installation mistakes and fabrication errors in workshop setting
Caption: Many site problems begin long before erection, especially when templates, bolt patterns, or fabrication tolerances are not checked early.
1. Shallow or Undersized Foundations
This is one of the most common long-term causes of leaning poles and cracked bases.
2. Misaligned Anchor Bolts
Even a few millimeters of error can lead to:
- grinding
- slotting
- re-drilling
- extra crane time
- delayed erection
3. Loading Concrete Too Early
Standing a pole before the concrete has gained sufficient strength is a common but avoidable risk.
4. Ignoring Wind and Attachments
Extra load from:
- banners
- CCTV
- larger luminaires
- solar fixtures
can change pole demand significantly.
5. Weak Grounding and Poor Sealing
Many handover issues come from:
- loose connections
- missing bond points
- poor handhole sealing
- moisture entering terminations
What Usually Causes Rejection on Site
In more formal projects, rejection often happens because of a small number of recurring issues:
- anchor bolts do not match the base plate
- pole is visibly out of plumb
- bracket direction is wrong
- handhole orientation is wrong
- grounding is missing or undocumented
- coating is badly damaged during erection
- concrete shows early cracking or poor finish
- records, photos, or test notes are incomplete
These are not just workmanship issues. They are handover issues.
Maintenance and Troubleshooting After Installation
Even a well-installed pole should be inspected over time.
Typical Maintenance Schedule
| Frequency | Recommended Task |
|---|---|
| Monthly | Check light operation |
| Quarterly | Inspect base plate, nuts, coating, and alignment |
| Annually | Repair small coating damage and check corrosion |
| After storms | Check leaning, damage, and loose fittings |
If a Pole Starts Leaning
Check:
- foundation cracking or settlement
- anchor-bolt looseness
- base plate contact
- vehicle impact damage
- surrounding soil erosion
If structural damage is suspected, stop guessing and have the installation reviewed properly.
What Buyers and Site Engineers Usually Check Before Handover
For better handover quality, buyers and engineers usually check:
- pole type matches approved drawing
- base plate and anchor bolts match the template
- pole verticality is acceptable
- electrical work is complete and safe
- grounding is installed correctly
- coating has not been badly damaged during erection
- labeling, photos, and records are complete
This is why good installation is not only a site task. It is also a documentation and acceptance task.
Pre-Handover Acceptance Checklist
Before signing off, confirm these points:
Civil and Structural
- foundation dimensions match approved drawing
- concrete curing period has been respected
- no visible cracking, voids, or settlement
- anchor bolts, nuts, and washers are installed correctly
- pole is plumb and stable
Electrical
- circuits are connected correctly
- protection devices are installed as required
- grounding is complete
- handhole and junction areas are sealed
Visual and Mechanical
- no major coating damage
- arm orientation is correct
- fixture direction is correct
- pole identification or labeling is complete where required
Records
- installation photos stored
- torque or inspection notes recorded
- handover observations closed out
- any punch-list item clearly assigned
Final Takeaway
Light pole installation is one of those jobs that looks simple until avoidable details go wrong.
In most projects, the biggest problems come from:
- poor planning
- wrong template control
- rushed foundation work
- weak grounding
- incomplete final checks
The safest approach is to treat installation as a sequence:
- check drawings and site conditions
- confirm pole delivery against the approved schedule
- set the foundation and bolts accurately
- erect and align carefully
- complete wiring and grounding properly
- document and inspect before handover
That is what turns a basic pole erection job into a reliable installation.
Need Help Reviewing Pole Drawings or Installation Details?
If you are preparing for a new road, industrial, estate, or solar-lighting project, we can help review:
- pole schedule
- anchor bolt template
- base plate and foundation interface
- installation method
- BOQ and technical details before ordering
Next actions:
- Explore Solutions
- View Lighting Pole Options
- See Project References
- Request Technical Review and Quotation (24H)
- Review Manufacturing & Quality
- See Markets We Serve
FAQ
What should be checked before pole delivery to site?
Before delivery, confirm pole height, bracket type, base plate size, bolt circle, handhole location, finish, accessories, and template compatibility with the approved drawings.
What usually causes light pole installation rejection on site?
The most common causes are anchor-bolt mismatch, pole misalignment, wrong bracket orientation, missing grounding, coating damage, concrete defects, and incomplete handover records.
How deep should a light pole foundation be?
The exact depth depends on pole height, wind load, soil condition, and the approved structural design. Do not rely on a generic rule when the project has actual drawings.
Can a permanent light pole be installed without concrete?
Permanent poles usually require a proper foundation unless the design is specifically developed for direct burial in suitable applications.
What causes the most delays in light pole installation?
The most common causes are anchor-bolt misalignment, wrong foundation setup, rushed concrete curing, poor grounding, incomplete site preparation, and late drawing checks.
