
Solar street lights can save money, but not simply because sunlight is free. For EPC contractors, municipal buyers, and infrastructure teams, the real saving usually comes from reducing trenching, cabling, grid extension, electricity bills, utility dependency, and repeated maintenance visits.
A solar street light project becomes economically strong when the full project cost is reviewed, not only the unit price of one lamp. The right question is not “How much does one solar street light cost?” The better question is: Will this system reduce the total life-cycle cost of the lighting project over its service period?
This guide explains when solar street lights usually save money, when they may not be the cheapest option, which hidden cost areas matter most, and what EPC teams should prepare before comparing quotations.
Quick Answer: When Do Solar Street Lights Save Money?
Solar street lights usually save money when the project site has high grid-extension cost, long cable routes, unstable electricity supply, remote maintenance conditions, or public-budget pressure to reduce operating expenses. They may not be the cheapest option when stable grid power already exists, trenching is simple, and the project only compares initial fixture prices.
In many municipal and road lighting projects, the purchase price of the lamp is only one part of the cost. A grid-connected street lighting project may also require cable trenches, conduits, distribution cabinets, meters, civil works, road cutting, reinstatement, and long-term electricity billing.
That is why solar street lighting should be evaluated as a life-cycle cost decision, not only as a product purchase.
Quick Comparison: When Solar Usually Saves More Money
| Project Condition | Solar Street Lights Usually Save More When... | Grid LED May Be More Economical When... |
|---|---|---|
| Grid access | utility extension is expensive, distant, or unreliable | stable power already exists nearby |
| Civil work | trenching and cabling are difficult or disruptive | cable routes are short and simple |
| Operating cost | long-term electricity cost matters | electricity cost is relatively low |
| Maintenance access | site visits are remote or expensive | maintenance teams are nearby and routine access is easy |
| Site development stage | road or area is new, remote, or weak-grid | electrical infrastructure is already in place |
| Procurement logic | the project compares delivered project cost | the project compares fixture price only |
The key decision is not whether solar fixtures cost more at purchase. The key decision is whether the project saves money after trenching, cabling, grid dependency, maintenance travel, and replacement risk are included.
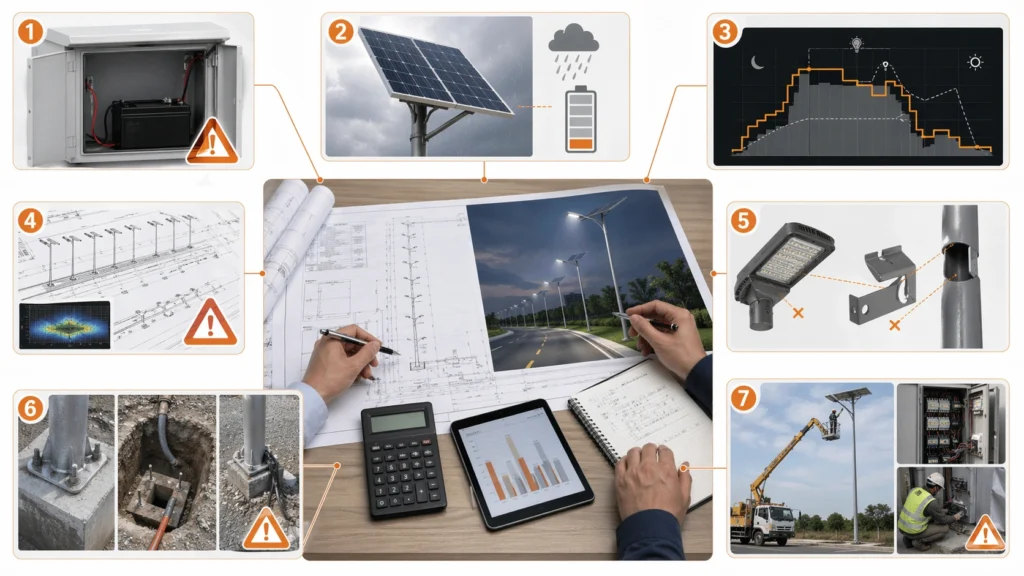
The 4 Project Cost Areas That Decide Whether Solar Street Lights Save Money

A fair cost review should compare four major project cost areas:
- trenching, cabling, and grid connection cost
- electricity and utility dependency
- maintenance and service access
- battery replacement and rainy-season autonomy risk
Solar street lights usually become more economical when they reduce several of these cost areas at the same time. If a project only compares fixture purchase price, the result can be misleading.
A simple life-cycle cost review can be understood as:
Total project cost = product cost + civil/electrical installation cost + operating cost + maintenance cost + replacement risk + documentation and approval risk
For solar street lights, the product cost may be higher at the beginning, but the project may save money if it reduces grid extension, trenching, electricity billing, and maintenance travel. For grid-connected lighting, the fixture may be cheaper, but the total installed and operating cost may become higher when cable routes, civil works, and utility dependency are included.
Why Unit Price Alone Gives the Wrong Answer
The unit price of a solar street light is often higher than a basic grid-powered LED street light because the solar system includes a solar panel, battery, controller, luminaire, bracket, and energy-storage design. But unit price does not show the full project cost.
A low-cost grid fixture may still require expensive underground infrastructure. A higher-priced solar fixture may reduce cable work, electrical coordination, grid connection, and future utility payments.
For EPC and municipal projects, unit-price comparison often misses several important cost areas:
- trenching and road cutting
- underground cable and conduit
- distribution cabinet and grid connection
- transformer or utility coordination
- electricity billing during operation
- maintenance access and service visits
- battery replacement planning
- failure risk during rainy seasons
- rework caused by under-specified systems
This is especially important for rural roads, municipal expansion roads, industrial access roads, parking areas, logistics zones, and public infrastructure projects where grid access is weak, distant, or expensive.
If your project is still comparing only fixture price, the evaluation is incomplete. A better approach is to compare installed cost + operating cost + maintenance cost + replacement risk.
For procurement teams, the wrong comparison is often lamp price vs lamp price. The better comparison is delivered project cost vs delivered project cost.
Cost Area 1: Trenching, Cabling, and Grid Extension
Trenching and cabling are often the largest hidden costs in traditional street lighting projects. For long roads, remote sites, or areas with existing pavement, civil work can quickly become more expensive than expected.
A grid street light usually depends on underground cable routes, conduit protection, connection points, electrical cabinets, and sometimes road cutting. These works may also create schedule risk because they involve civil contractors, electrical contractors, utility coordination, and site reinstatement.
Solar street lights can reduce these costs because each pole has its own energy system. In many projects, this means:
- less underground cable work
- less road cutting and reinstatement
- fewer grid-connection approvals
- faster installation in remote or undeveloped areas
- lower dependency on existing electrical infrastructure
This does not mean solar street lights have no installation cost. Poles, foundations, lifting, alignment, and system commissioning still matter. But when grid extension is difficult or expensive, solar systems can create a clear economic advantage.
Cost Area 2: Electricity Bills and Utility Dependency
For grid-connected street lights, electricity cost is not a one-time issue. It continues throughout the project life. Over time, this operating cost can become a major part of the total project expense, especially in roads with long operating hours or rising utility prices.
Grid dependency also creates additional risk. In some regions, unstable power supply, delayed connections, weak voltage quality, or future tariff changes can reduce the reliability and predictability of the system.
Solar street lights are different because the lighting energy is generated and stored on site. This can reduce or eliminate recurring electricity billing for lighting operation. In municipal and public projects, this can also reduce pressure on operating budgets.
However, the saving must be calculated realistically. A solar street light still needs:
- correct solar panel sizing
- battery capacity matched to local conditions
- efficient LED and optical design
- suitable dimming profile
- proper autonomy planning for rainy seasons
- maintenance access for future service
A solar street light that is under-sized may look cheaper at purchase, but it can create higher costs later through battery failure, poor lighting performance, or frequent service visits.
Cost Area 3: Maintenance Cost Over the Project Life
Solar street light maintenance cost depends heavily on product quality, system architecture, battery life, installation quality, spare-part standardization, and service planning. A well-designed system can reduce daily operating cost, but a poorly specified system can create repeated maintenance problems.
For EPC contractors, maintenance cost is not only about replacing parts. It also includes:
- dispatching workers to the site
- transport cost for remote locations
- lifting equipment or ladder access
- troubleshooting time
- spare-part availability
- warranty claims
- client complaints after handover
- reputation risk during the defect-liability period
This is why a cheap system can become expensive if it fails during the first rainy season or if battery replacement is required too early.
A good maintenance evaluation should ask:
- Is the battery type suitable for high-temperature operation?
- Can the luminaire, battery, and controller be serviced safely?
- Are replacement parts standardized across the project?
- Is there a clear inspection and handover checklist?
- Does the supplier provide datasheets, drawings, and configuration records?
- Is there a realistic service plan after handover?
For larger projects, buyers should ask for clear product documentation, not only sales pictures. Sunlurio provides datasheets and drawings to help EPC and municipal teams review configuration details before final selection.
Cost Area 4: Battery Replacement and Rainy-Season Autonomy Risk
Battery replacement is one of the most important life-cycle cost factors in solar street lighting. If the battery is under-sized, exposed to excessive heat, or forced into deep discharge too often, replacement cost may appear much earlier than expected.
This is where many project cost calculations become unrealistic. Some proposals compare solar and grid lighting only by purchase price and electricity saving, but they do not check whether the battery system can survive the real operating environment.
A proper economic review should include:
- local worst-month solar conditions
- rainy-season duration
- required lighting hours per night
- dimming strategy
- battery depth of discharge
- battery temperature environment
- battery replacement access
- warranty and service responsibility
For Africa, the Middle East, and Southeast Asia, this point is especially important because many projects face heat, dust, rainy seasons, coastal exposure, weak maintenance access, or unstable grid conditions.
A solar street light system that performs well in ideal weather may still fail economically if it is not designed for the hardest operating months.
Solar Street Light vs Grid Street Light: Cost Comparison Points
A fair cost comparison should include both visible and hidden cost items. The best choice depends on the site, not on a single product price.
-
Fixture purchase cost
Grid LED fixtures are usually lower in purchase price. Solar street lights are usually higher because they include solar panel, battery, controller, bracket, and energy-storage components. -
Trenching and cabling
Grid street lights often require cable routes, conduits, road cutting, and electrical connection work. Solar street lights can reduce or avoid many of these civil and electrical works. -
Grid connection
Grid lighting depends on available power infrastructure and connection approval. Solar street lights operate independently and are often easier to deploy in weak-grid or off-grid areas. -
Electricity bill
Grid street lights create ongoing electricity cost. Solar street lights generate and store their own energy for lighting operation. -
Installation flexibility
Grid lighting layout is often limited by cable route and connection points. Solar lighting can be more flexible for remote roads, new development zones, parking areas, and public spaces. -
Maintenance focus
Grid lighting maintenance often involves electrical faults, cable issues, and utility dependency. Solar lighting maintenance focuses more on battery condition, controller performance, solar panel cleanliness, and system configuration. -
Main risk
Grid lighting risk often comes from civil work, grid dependency, cable faults, and electricity cost. Solar lighting risk often comes from under-sized batteries, weak solar panel margin, poor autonomy design, or low-quality components.
The economic benefit of solar street lighting is strongest when it reduces multiple cost items at the same time. If the only saving is electricity, the payback may be slower. If the system also avoids trenching, cabling, grid extension, and repeated maintenance travel, the business case becomes much stronger.
For project-level review, it is better to request a BOQ-aligned technical package instead of relying only on catalog pricing. Sunlurio supports tender teams with BOQ and tender document references for clearer procurement comparison.
Where Solar Looks Cheap on Paper but Becomes Expensive Later
The biggest economic risk in solar street lighting is not always the product price. It is the cost of wrong assumptions. A project can look cheap during procurement but become expensive after installation if the system fails in real operating conditions.
These repeated field patterns often explain why a low-price quote turns into a high-cost project later:
1. The battery was reduced to win the price comparison
A smaller battery reduces purchase price, but it may increase failure risk during rainy seasons. If lights turn off early or batteries degrade quickly, maintenance and replacement costs can exceed the original saving.
2. The solar panel was sized for ideal weather, not real recovery conditions
A solar panel should not be selected only for ideal-weather output. The system should be reviewed against local solar conditions, road lighting schedule, and recovery after consecutive cloudy days.
3. Dimming logic looked efficient on paper, but weak on the road
Dimming can reduce energy consumption, but it must match road safety expectations. An aggressive dimming profile may save battery capacity on paper but create unacceptable lighting performance on site.
4. The BOQ was too loose to compare like-for-like systems
If the BOQ only says “solar street light” without clear model, pole height, battery capacity, panel size, optics, lighting mode, and installation scope, suppliers may quote very different systems under the same item name.
5. The lighting design was not checked before procurement
Solar street lighting is not only an energy system. It is still a road lighting system. Pole spacing, optical distribution, road width, and mounting height should be reviewed before final procurement. Project teams can request DIALux simulation outputs when lighting performance needs to be checked.
6. Spare parts were not standardized across the project
Large projects should consider whether batteries, controllers, luminaires, and brackets are standardized. If every batch uses different components, long-term maintenance becomes harder.
7. Installation review was treated as a later task
Even a good product can fail if installation angle, pole alignment, foundation quality, or cable connection is poor. Installation details should be included in the handover and acceptance process.
Example: When a Higher Solar Unit Price Still Wins
A grid LED street light may look cheaper at quotation stage. But if the road requires long trenching distance, underground cable, utility approval, road reinstatement, and long-term electricity billing, the total project cost may rise quickly.
A solar street light may have a higher unit price, but the project can still become more economical if it avoids grid extension, reduces cable work, shortens installation time, and lowers future operating cost.
For procurement teams, the wrong comparison is often lamp price vs lamp price.
The better comparison is delivered project cost vs delivered project cost.
What Buyers Should Prepare Before Comparing Quotations
To compare solar street lights and grid street lights more realistically, project teams should prepare the basic project inputs before requesting a quotation. Without these inputs, suppliers may quote different assumptions, and the lowest price may not represent the lowest total cost.
| Required Input | Why It Matters |
|---|---|
| Project location and climate | affects solar yield, heat, dust, and rainy-season risk |
| Road type and road width | affects lighting design and system sizing |
| Pole height and spacing | affects output demand and layout logic |
| Existing grid access condition | determines whether grid extension cost is a real issue |
| Lighting hours and dimming schedule | affects battery and panel sizing |
| Rainy-season or cloudy-day requirement | affects autonomy and replacement risk |
| Maintenance access condition | affects long-term service cost |
| BOQ format or tender requirements | helps compare like-for-like systems |
| DIALux or lighting simulation requirement | confirms whether lighting performance assumptions are realistic |
With these inputs, the comparison can move from a simple product price discussion to a project-level cost review. This helps EPC contractors and municipal buyers avoid unclear specifications, unrealistic autonomy claims, and under-sized systems that may create higher cost after installation.
How Sustainability and Cost Savings Connect in Solar Street Lighting
Sustainability and cost savings connect when solar street lights reduce grid dependency, lower long-term public operating pressure, and support lighting deployment in areas where electrical infrastructure is weak or expensive to extend.
For municipalities and infrastructure teams, sustainability should not only mean using renewable energy. It should also mean reducing recurring operating burden, improving night-time visibility, and making project delivery more practical in weak-grid roads, villages, parking areas, and public spaces.
A solar street lighting system is only truly sustainable when it is correctly sized, properly installed, realistically maintained, and supported with clear technical documentation.
A low-quality solar street light that fails after one rainy season does not create real sustainability. It creates replacement cost, maintenance pressure, and public dissatisfaction.
For buyers who want to review real project examples, Sunlurio provides solar street lighting project references across different road and public lighting applications.
How Sunlurio Helps Buyers Evaluate Real Cost Savings
Sunlurio reviews solar street lighting projects from both the energy side and the project-delivery side. For EPC contractors and municipal buyers, the goal is not only to provide a lamp, but to help the project team compare real conditions before final specification.
For cost-sensitive projects, the review usually includes:
- road type and road width
- pole height and spacing assumptions
- required lighting level
- solar exposure and rainy-season conditions
- battery and panel configuration
- dimming schedule
- product architecture selection
- BOQ matching
- drawing and datasheet support
- project handover and acceptance references
Different project sites may need different system types. A simple access road may use all-in-one solar street lights for easier installation. A higher-output municipal road may require all-in-two or split solar street light systems with more flexible panel and battery sizing.
Buyers can review broader solar street light system options before deciding which architecture is more suitable for their project.
Request an Engineering Support Pack
For EPC and government projects, the most useful first step is not asking for the cheapest price. It is preparing the project conditions clearly enough for technical and commercial comparison.
If you are actively comparing solar street lights and grid lighting for a live project, send the road width, pole height, spacing expectation, lighting hours, project location, and BOQ requirements first. A project-based review is more useful than a simple catalog quotation.
If you already have road width, pole height, lighting hours, BOQ requirements, or tender inputs, the next step is to request a review package that helps compare configuration, documentation, and delivered project cost more clearly.
Request an Engineering Support Pack
Final Takeaway
Solar street lights can save money, but the saving comes from the whole project system, not from the lamp alone. The strongest economic benefit usually appears when solar lighting reduces trenching, cabling, grid extension, electricity bills, utility dependency, and maintenance travel.
For EPC and municipal projects, the correct decision should be based on life-cycle cost, not only unit price. A well-sized solar street light system may cost more at purchase, but it can become more economical when the project site makes grid infrastructure expensive or unreliable.
The best result comes from honest evaluation: check the road condition, grid situation, autonomy requirement, lighting performance, maintenance plan, and BOQ details before final procurement.
FAQ
Do solar street lights always save money?
No. Solar street lights do not always save money in every project. They usually become more economical when the site has expensive grid extension, long trenching distance, unstable electricity supply, or high long-term operating cost.
Are solar street lights cheaper than grid street lights?
Not always. Solar street lights are usually not cheaper if only the fixture purchase price is compared. They may become more economical when trenching, cabling, grid connection, electricity billing, and maintenance cost are included.
What affects the payback period of solar street lights?
The payback period depends on grid-extension cost, trenching and cabling cost, electricity price, maintenance access, battery replacement cycle, lighting schedule, and local solar conditions.
What is the biggest hidden cost in solar street lighting?
One of the biggest hidden costs is wrong system sizing. A low-price solar street light may create higher long-term cost if the battery is under-sized, the panel margin is weak, or the autonomy logic does not match the real site conditions.
What is the most common mistake when comparing solar and grid street lighting costs?
The most common mistake is comparing fixture price to fixture price instead of comparing delivered project cost to delivered project cost. A fair review should include trenching, cabling, grid connection, electricity billing, maintenance access, replacement planning, and documentation risk.
How should EPC teams compare solar street lights and grid street lights?
EPC teams should compare life-cycle cost, not only unit price. This includes product cost, civil and electrical installation cost, electricity billing, maintenance access, battery replacement, and documentation or approval risk.
Is battery replacement part of the life-cycle cost?
Yes. Battery replacement is one of the most important life-cycle cost factors in solar street lighting, especially in hot, dusty, rainy, or weak-maintenance environments.
Are solar street lights good for municipal roads?
They can be, especially where grid extension is expensive, electricity supply is unstable, or public operating budgets need to be controlled. But they should still be reviewed against road width, pole spacing, lighting level, and local climate.
What documents should buyers request before ordering?
Buyers should request datasheets, drawings, configuration details, BOQ-aligned specifications, battery and solar panel sizing information, and DIALux or lighting simulation support when needed.
Can solar street lights reduce trenching and cabling cost?
Yes. In many projects, solar street lights reduce or avoid underground cable routes, conduit work, road cutting, and some grid-connection requirements. This is often one of the strongest economic advantages of solar lighting.
Do solar street lights work well in Africa, the Middle East, or Southeast Asia?
They can work well, but only when the system is designed for local heat, dust, rainy seasons, solar conditions, and maintenance access. A system that works in ideal weather may still fail economically if it is not designed for the hardest operating months.
